In this tutorial, we will guide you on how to create a typographic go green theme poster in Photoshop.
Things you need for this tutorial:
Swirls Brush Pack
http://tiffcali06.deviantart.com/art/Swirls-109932680
Scenery Scrawl PS Brushes
http://myphotoshopbrushes.com/brushes/id/389/
Step 1 – Working on the Background
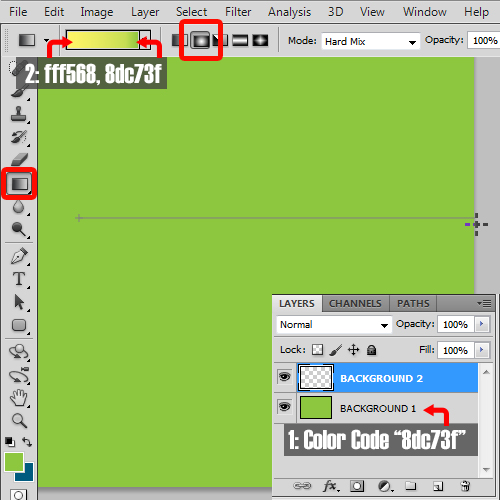
Let’s work on the background first. For that, pick up the paint bucket tool and select green color for the fill. For this tutorial, we have used the color code “8dc73f”. Now rename the layer to “background 1” and apply the color on the canvas.
With that done, create another layer and rename it “background 2”. Next, pick up the “Gradient” tool and from the Gradient Editor window, configure “8dc73f” for the right side and “fff568” for the left side. Make sure you have the “Radial gradient” option selected. After that, draw a straight line on the canvas from the center towards the right side. Lastly, change the layer mode to “Multiply”.
Step 2 – Adding the Border
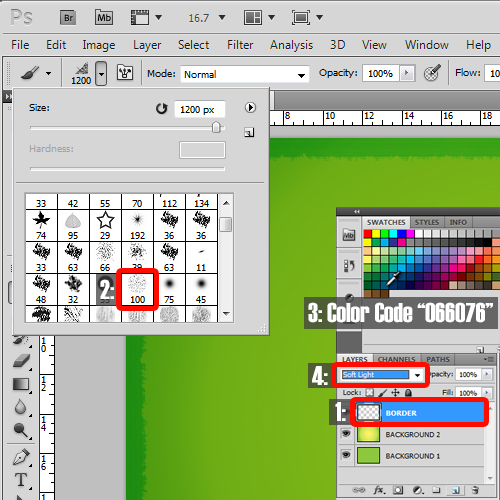
With that done, create another layer and name it “border”. Next, pick up the “Brush” tool and select the “Rough Round Bristle” brush which is available by default in Photoshop. You can find it in the “Thick Heavy Brushes” section. With that done, pick up a shade of blue from the swatches. For this tutorial, we have used the color code “005b7f”. Apply the brush on the borders of the canvas and change the layer mode to “soft light”.
Step 3 – Adding patterns
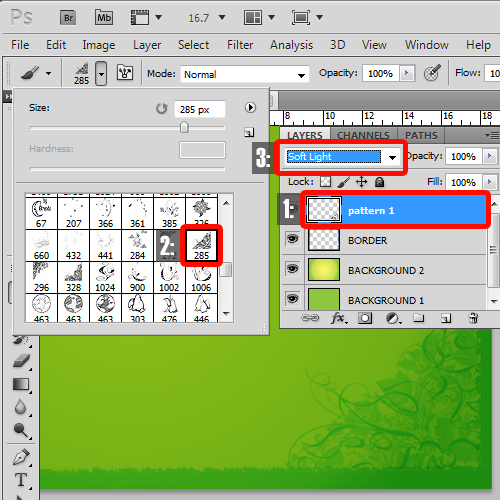
Next, create another layer and rename it “pattern 1′. After that, pick up the Brush tool and choose a floral swirls brush for the border. Pick up the corner brush, increase the size and apply it on the bottom right side of the canvas. We have used the same color code for this brush as well, that is, “005b7f”. Next, change the layer mode to “soft light” and we are done with the background.
Step 4 – Working with the Text
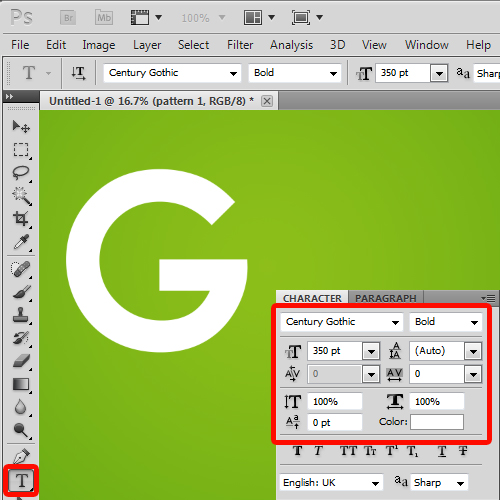
Now it’s time for the text. We will be writing “Go Green” on the canvas. So to get started, pick up the type tool and write capital “G” using “Century Gothic” for the font and keeping the size to 350 points. You can change the size according to your requirements. With that done, change the color of the font to white and rasterize the text layer.
Step 5 – Overlay Text
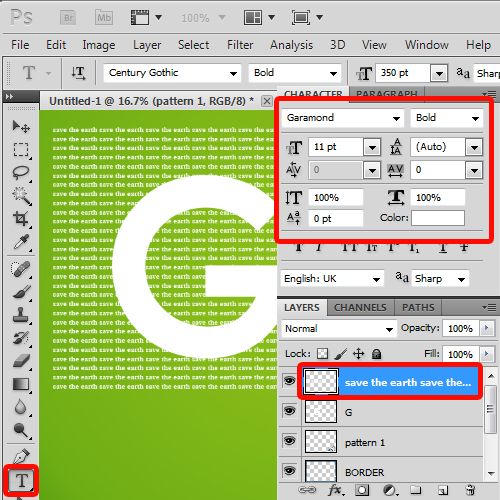
Next, make a text box over the letter “G” and fill it with text. For this text layer, set the font type to Garamond and change the size to 11 points. Over here, we have simply written “save the earth” and copied it to fill the entire textbox. Lastly, change the color of the text to white and rasterize the layer.
Step 6
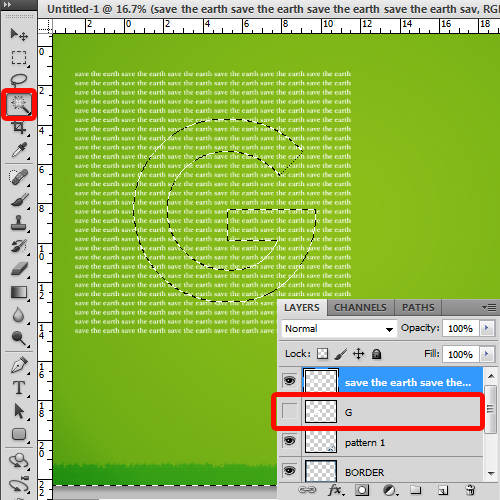
Next, select the layer the letter G is on and use the “magic wand” tool to make a selection of the letter. Now hide this layer and go back to the “save the earth” layer. Press “Ctrl + Shift + I” to inverse the selection and then press delete to remove the extra text. This way, only the text falling in the shape of the letter will be left out.
Step 7 – Blending Options
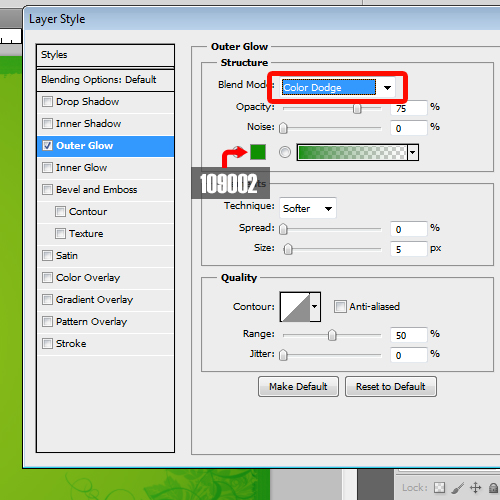
Next, double click on the “save the earth” layer to open up the blending options. Over here, select the outer glow option and choose a shade of green for the color. For this tutorial, we have used the color code “109002”. Next, change the blend mode to “Color Dodge” and that’s it.
Step 8 – Entering the Rest of the Text
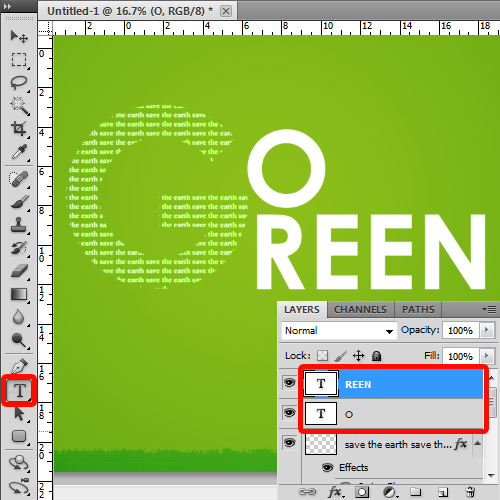
Now insert the rest of the text using the same font. Since both the words “Go” and “Green” start with the letter G, only insert the rest of the letters for both words in two separate layers and arrange them.
Step 9 – Final Touches
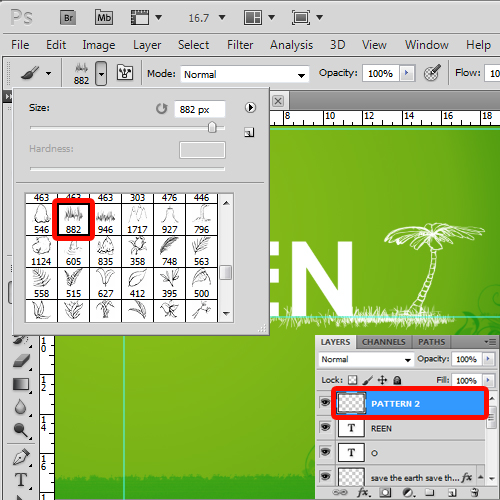
Finally, create a new layer and name it “Pattern 2”. With that done, use another brush pack to add grass and trees to the artwork. You can even use free stock photos for this as well, but for now let’s use the brush tool.
For this tutorial, we have used the “Scenery Scrawl” brush pack which can be downloaded from myphotoshopbrushes.com. This brush pack provides various sketch illustrations out of which we have used the grass illustration and both the tree sketches.
With that done, our poster is complete.
 Home
Home