You can create vector images in Illustrator so as to make different graphics. Making vector images allows you to edit and work on them in Adobe Illustrator.
To learn how to create a movie clap board in Adobe Illustrator, follow the tutorial below.
Step # 1 – Offset the rectangle
To create a film slate first make a rounded rectangle with the dimensions “190px x 150px” and radius “8px”.
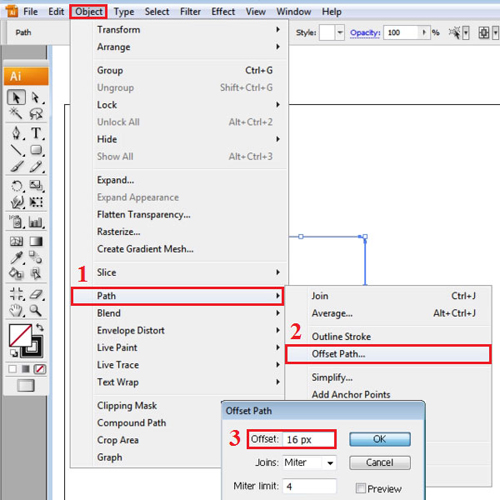
Offset its path by going to the “object” menu, dropping down to “path” and then selecting the “offset path” option. Enter the offset value as “16px”.
Choose the larger rectangle and add gradient to it. Keep the gradient slider on the right to 80% black and the one on the left to 50% black.
Step # 2 – Intersect two shapes
Now, make an ellipse of “385px x 230px”. Position the bottom of the ellipse at the center of the rectangles.
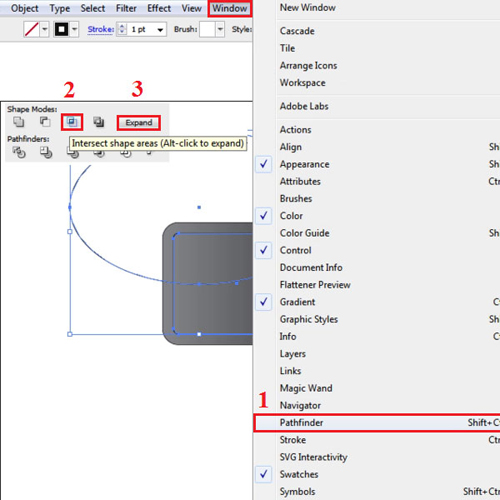
Copy the smaller rectangle by pressing “ctrl + c” and then click “ctrl + v” to paste it on top of the original one. Select the copy and the ellipse and intersect the two shapes from the “pathfinder panel”. The “pathfinder panel” can be opened from the “window” menu. Once you intersect the two shapes then while they are still selected “expand” them.
Step # 3 – Add gradient to the intersected shape
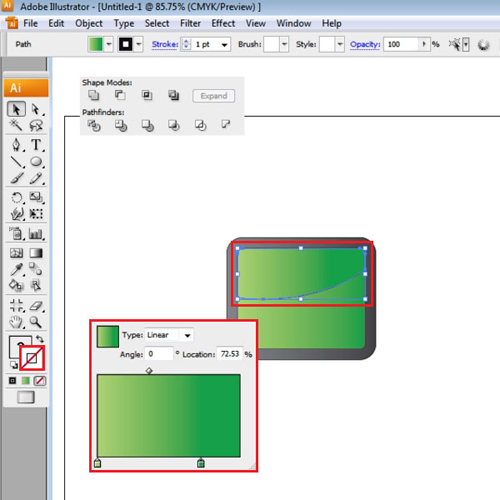
Next add gradients to the intersected shape. For this choose any color to fill in the gradient sliders and remove the strokes of the objects.
Repeat the process to add gradient to the smaller original rectangle. Use the same color as that filled in the intersected shape. Adjust the gradient sliders as per your requirement.
Once you have filled in all these shapes with gradients, offset the paths of both rectangles by “2px”.
Step # 4 – Add gradient to the offset shapes
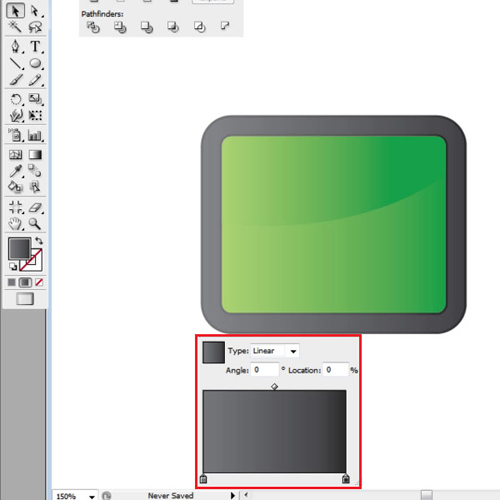
Select the offset rectangles that you just created and fill them with a darker gray-black gradient from the gradient panel on the right side of the page.
Step # 5 – Make the clap
To make the claps existing on top of the slate, create another rectangle with the dimensions: “240px x 28px”. Add gradient to it with three gradient sliders, the extreme right and left ones being 20% black while the center one white. Take the gradient slider in the middle to the right and in between the two gradient sliders at the right add another which is “85%” black. Make the angle of the gradient “90”
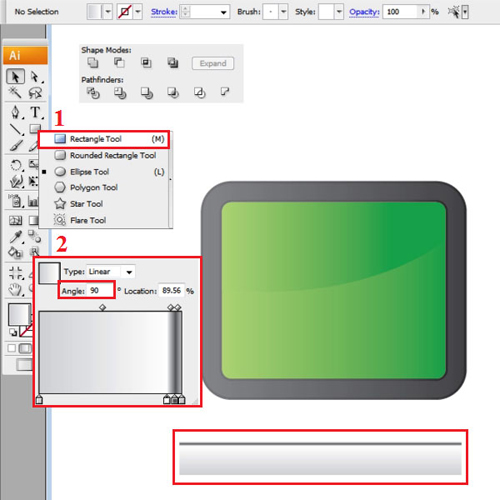
Step # 6 – Make the inside of the clap
After this, draw another rectangle which is “16px x 64px”. Drag it to the clap that you just made and rotate it. Now, Copy then, paste it, and move the copy to the other side of the clap.
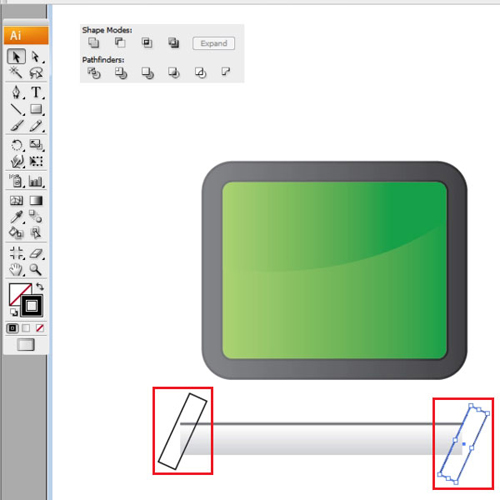
Step # 7 – Adjust the blend settings
Select both of these rectangles and go to the “object” menu. From there go to “Blend” and open its options. In spacing, open the drop down menu and choose the “specified steps” option. Enter “3” in the space provided and press “ok”.
Keep selecting the two rectangles and go to again to “object”, then “blend” and then select the “make” option.
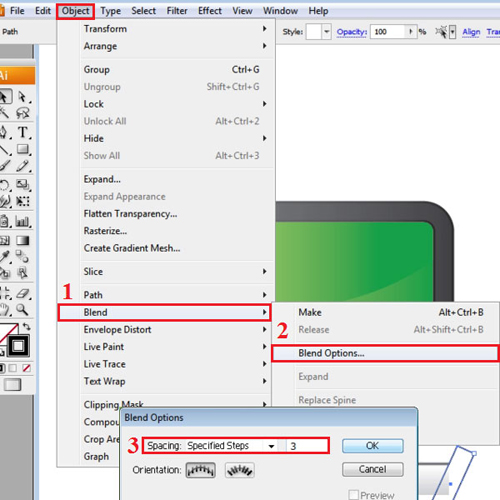
Step # 8 – Intersect the rectangles
Now, copy and paste the clap. Bring it on top of the smaller rectangles and send it backward. Select the copy and the smaller rectangles and press the “intersect” option from the pathfinder panel. Now “expand” the two shapes.
Choose the intersected shape and add gradient to it. Keep the gradient slider on the right at 50% black and the left one at 80% black.
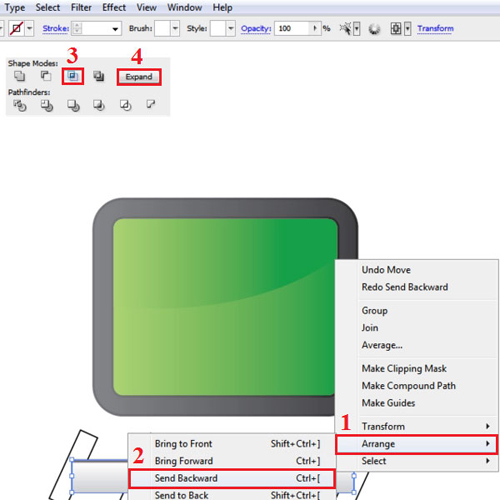
Step # 9 – Position the claps
Select the copy of the clap, go to the “transform” tab on the pathfinder panel and from the drop down arrow choose the “flip horizontal” option.
Bring both claps on top of the slate and rotate the top one by means of the “selection tool”.
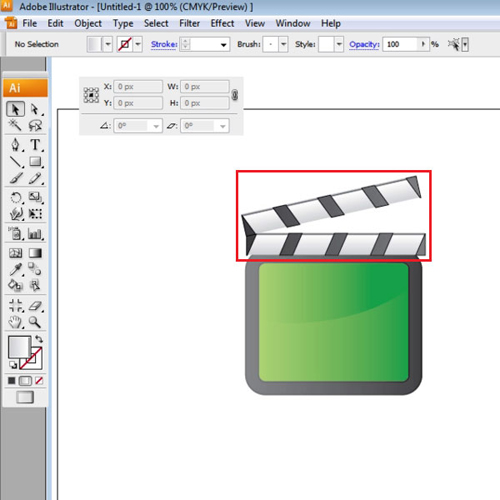
Step # 10 – Stylize the triangle
The last illustration to draw is the hinge between the claps. To make this, select the “star tool” from the shape tool menu. Click with this tool on the screen and a popup settings panel appears. Enter the radius 1 as “30px”, Radius 2 as “15px” and points as “3”.
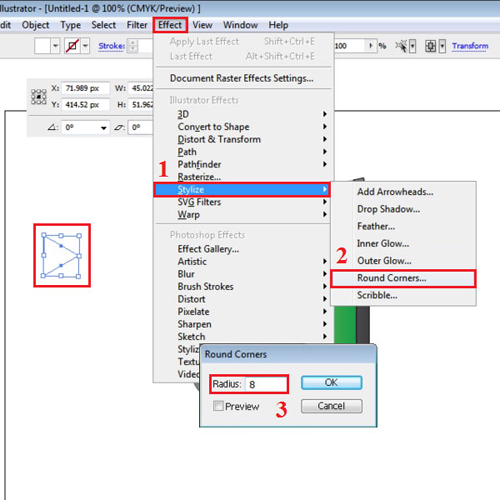
Once done with this, keep selecting the drawing and go to the “effect” menu, drop down to “stylize” and select the “round corners” option. From the popup settings menu that appears enter the radius as “8”.
Step # 11 – Intersect the triangle
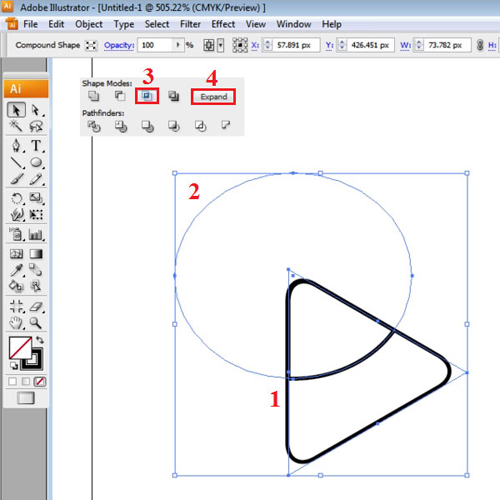
Next draw an ellipse with the dimensions “60px x 52px”. Select no color in both shapes. Bring the ellipse midway on the triangle. Copy the triangle by pressing “ctrl + c” and paste it by pressing “ctrl + v”. Select the copy of the triangle and the ellipse and from the pathfinder panel, intersect them and then “expand”.
Add a gray gradient to the intersected shape by selecting it from the “gradient panel” in Illustrator present on the right side of the page. Next add gradient to the original triangle. Add a lighter gradient to the intersected shape than the triangle. Remove the stroke of both shapes.
Step # 12 – Draw an ellipse
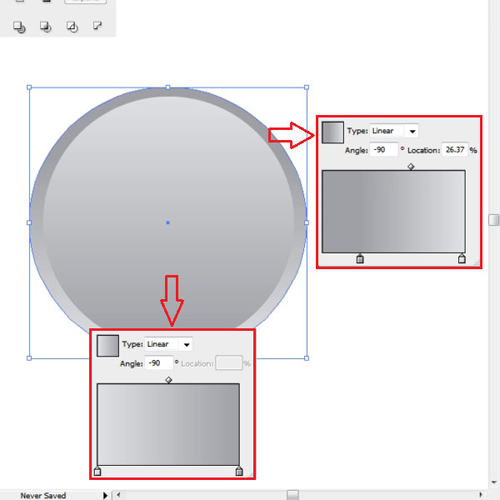
To create the screws of the hinge make a circle from the ellipse tool with the dimensions “5px x 5px”. Copy and paste the circle. Increase the dimensions of the copied circle and send it backward.
Insert lighter gradient in the original ellipse and a darker one in the copy at the back. Copy and paste both of the circles.
Position these screws on the hinge and then select the complete object and place it on the claps. Your movie clap board is now ready for further use.
 Home
Home