A neon sign is a bright and glowing sign that is used widely for marketing purpose. Due to its impressive glowing light, people find it helpful to attract customers towards their business. We can easily create a neon text effect by using Adobe Photoshop. There are various tools available in Photoshop through which we can create different text effects on our images which can be further used for the advertisement and marketing purposes.
Follow this tutorial to learn how to create a neon effect in Photoshop.
Step # 1 – Go to the File Menu
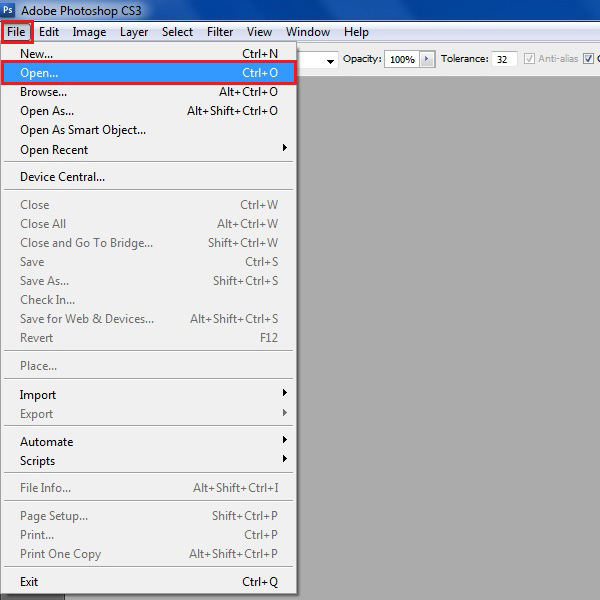
In the first step, launch Adobe Photoshop and go to the “File” menu which is located at the top left corner of the screen. Click on it and select the “Open” option from the menu.
Step # 2 – Select a Bricks Image
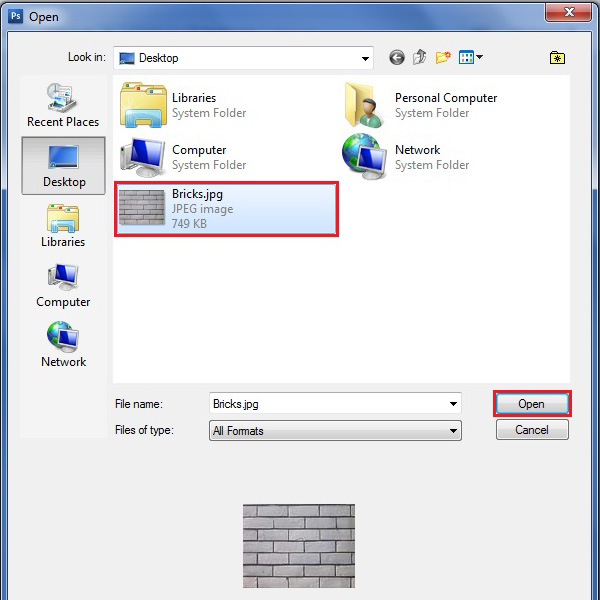
In the browsing window, select an image of a bricks for the background. Now click on the “Open” button to load it on the main page.
Step # 3 – Open the Image Size Panel
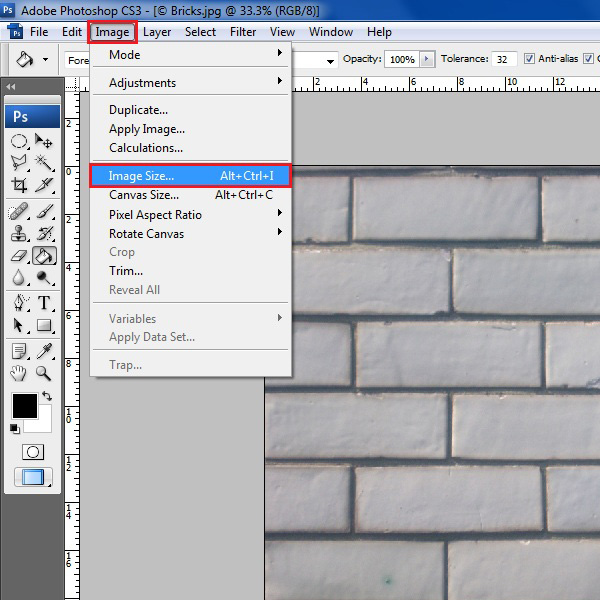
Move over to the “Image” menu and select the “Image Size” option from the list. This will open the Image Size control panel.
Step # 4 – Adjust the Size
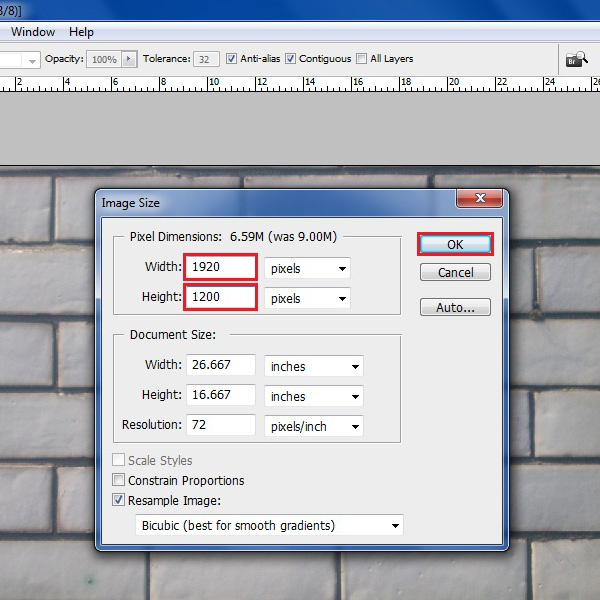
In the Image Size panel, choose the “Width” of the image as “1920 pixels” and “Height” as “1200 pixels”. Now click on the “OK” button to apply these settings on the image.
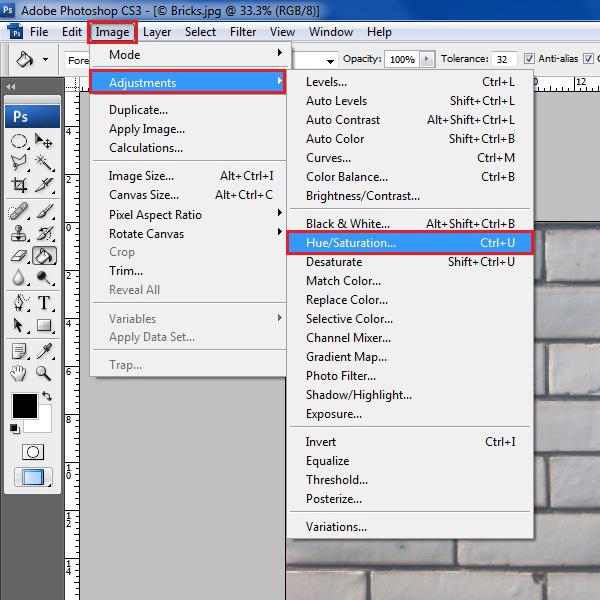
Step # 5 – Open the Hue / Saturation Panel
Now again go to the “Image” menu and select the “Adjustments” option from the list. Click on the “Hue/Saturation” option from the menu to open the settings panel.
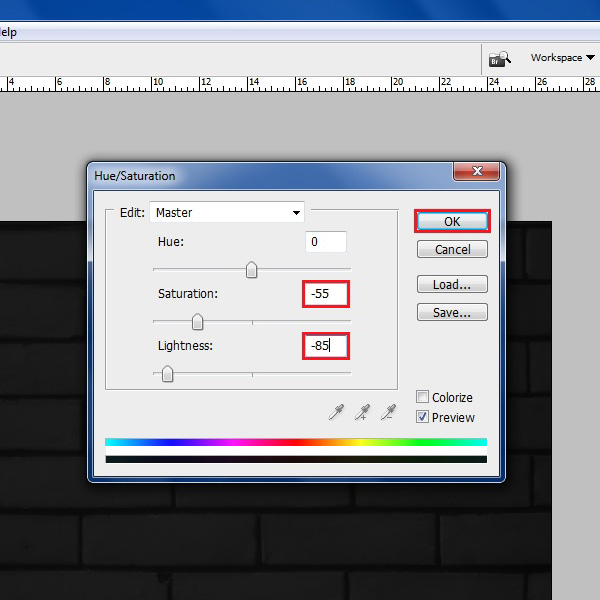
Step # 6 – Adjust its Saturation and Lightness
In the settings panel, reduce the “Saturation” option to “-55” and “Lightness” option to “-85”. After changing it, click on the “OK” button to apply these settings.
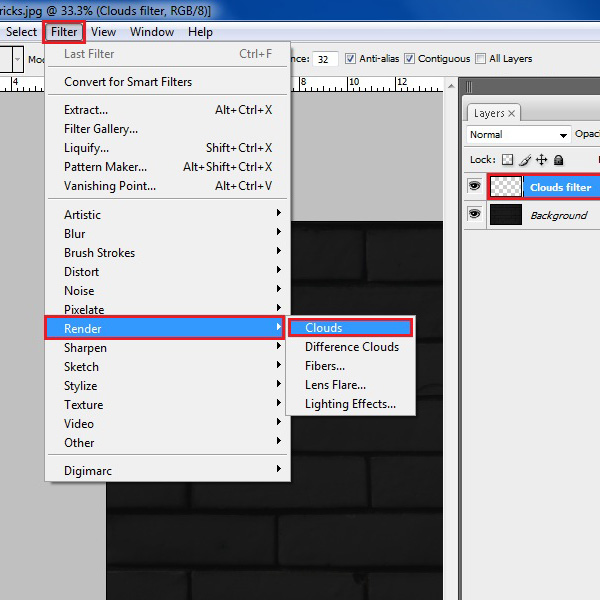
Step # 7 – Apply a Clouds Filter
Now insert a new layer and change its name to “Clouds Filter”. Go to the “Filter” menu and click on the “Render” option from the list. Select the “Clouds” filter from the menu to apply it on the layer.
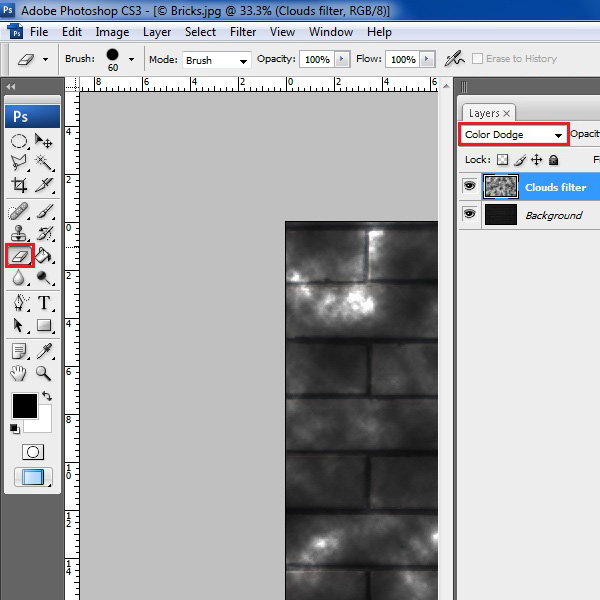
Step # 8 – Change the Blending Mode
Move over to the “Blending Mode” which is located on top of the layer’s panel. Click on it and select the “Color Dodge” option from the list. Now select the “Eraser” tool from the menu.
Step # 9 – Apply the Eraser Tool
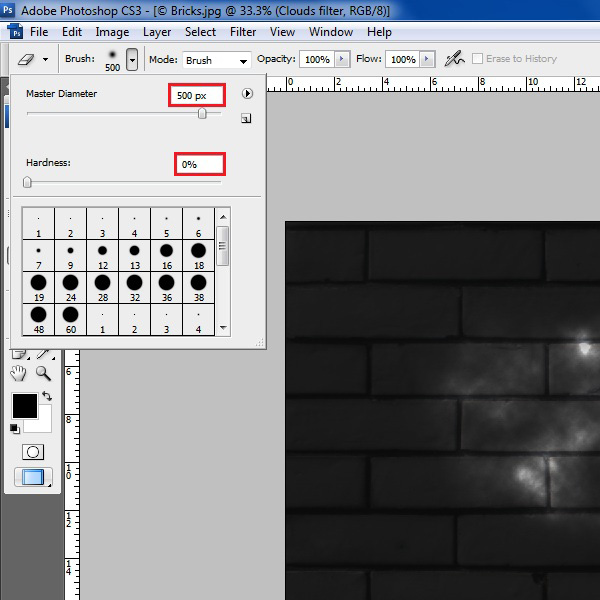
After selecting the “Eraser” tool from the menu, change its “Hardness” to “0%” and “Diameter” to “500 pixels”. Now use the eraser tool to remove the cloud filter effects on the edges.
Step # 10 – Insert the Text
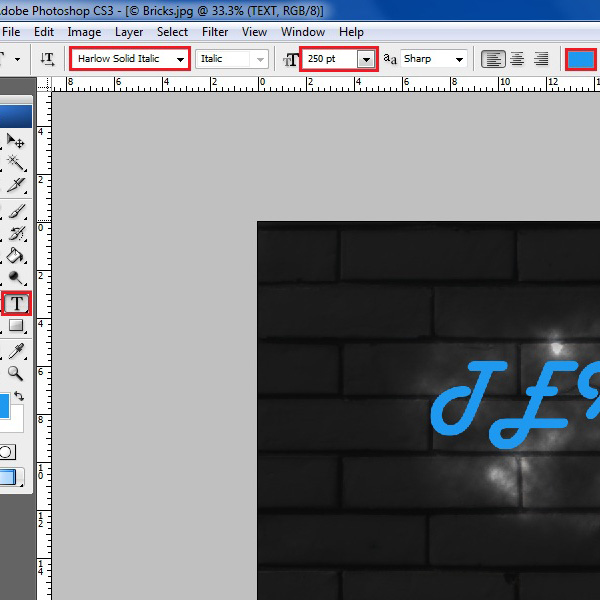
Now select the “Text” tool from the menu and choose the “Harlow Solid Italic” fonts. Choose the “Size” of the text as “250 pt” and a “Light Blue” color from the menu. Use the color code as “1a99f1” for the reference.
Write your desired text and place it on top of the bright space in the center of the image.
Step # 11 – Duplicate the Layer
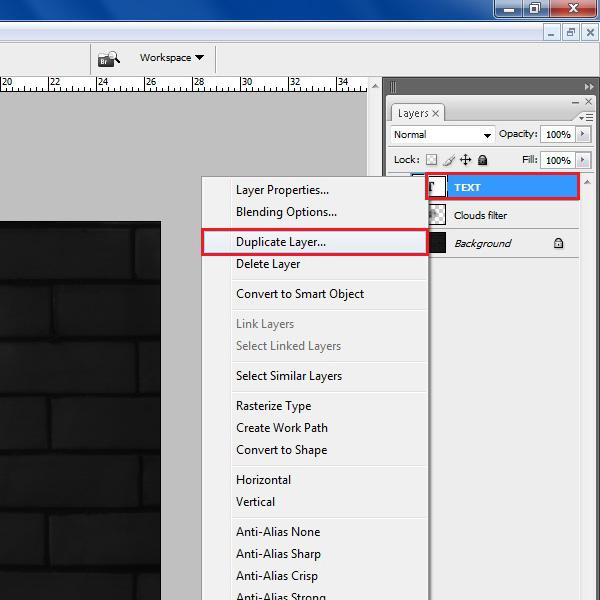
Right click on the “Text” layer and select the “Duplicate Layer” option from the menu. This option will create a copy of this layer.
Step # 12 – Apply a Gaussian Blur
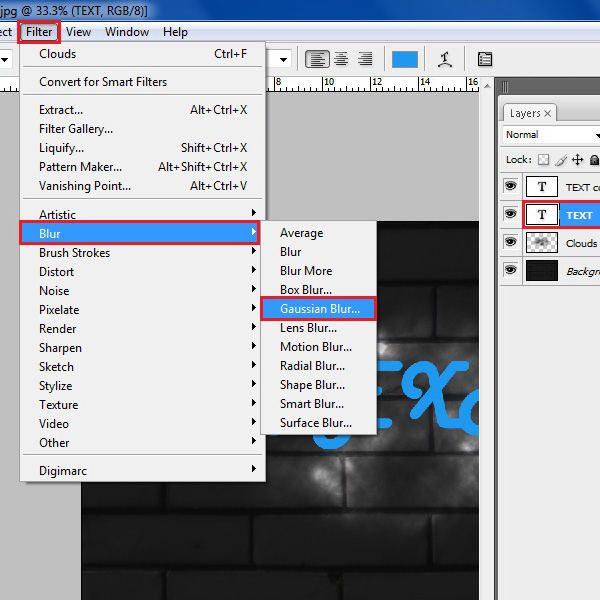
Now select the original “Text” layer and apply some filter on it. For this purpose, go to the “Filter” menu and click on the “Blur” option from the list. Select the “Gaussian Blur” filter from the menu to apply it on the layer.
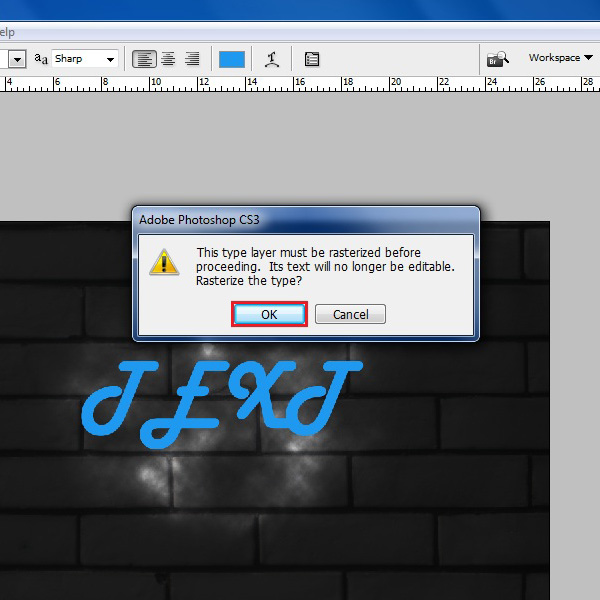
Step # 13 – Rasterize the Layer
A message will display on your screen confirming you to rasterize the layer or not. Click on the “OK” button to rasterize the layer and proceed.
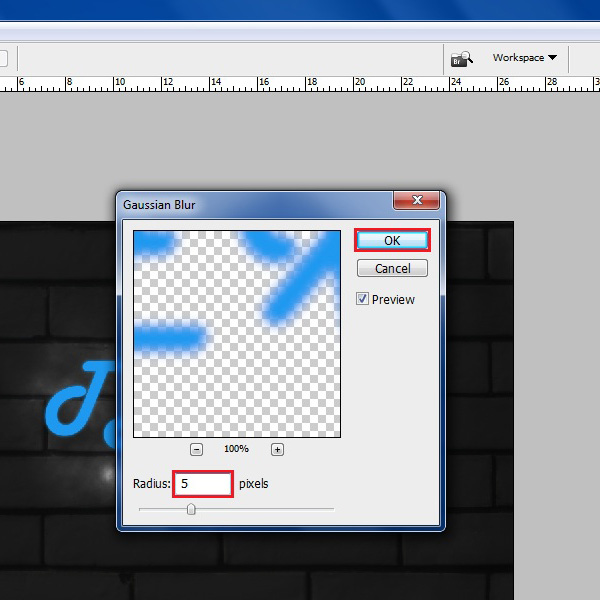
Step # 14 – Choose the Radius
In the Gaussian Blur filter mode, choose the “Radius” to “5 pixels” and click on the “OK” button to apply it.
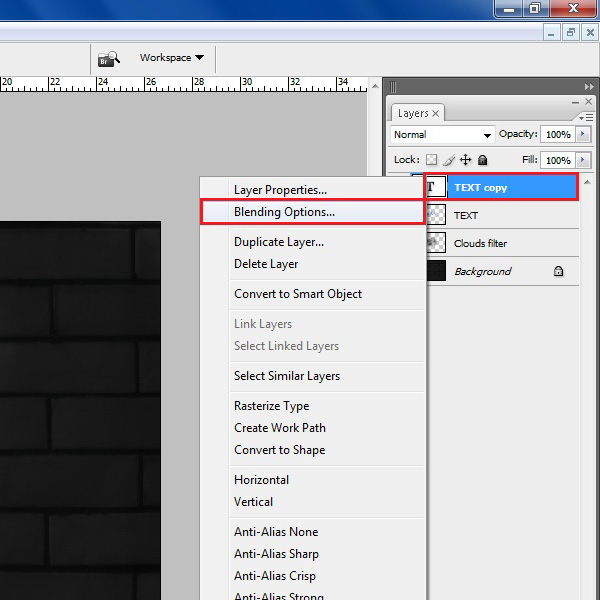
Step # 15 – Open the Blending Options
Now select the “Text copy” layer and right click on it to open up a menu. In this menu, select the “Blending Option” to open its settings panel.
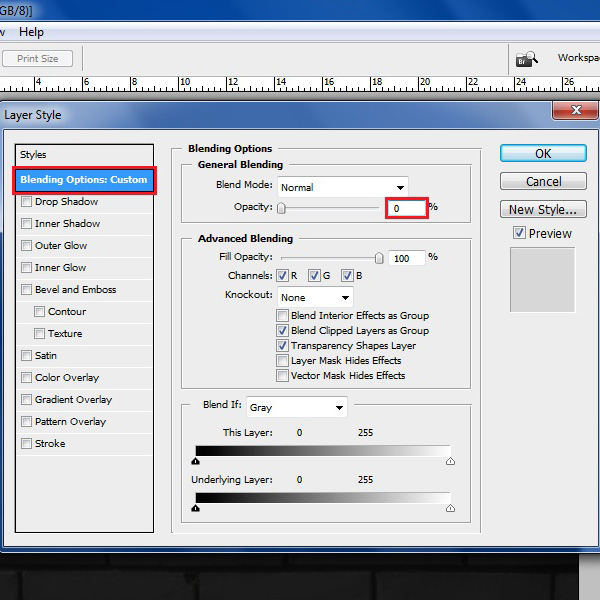
Step # 16 – Change the Opacity
In the Blending options panel, select the “Blending Options Custom” tab from the menu. Now choose the “Opacity” option to “0%”.
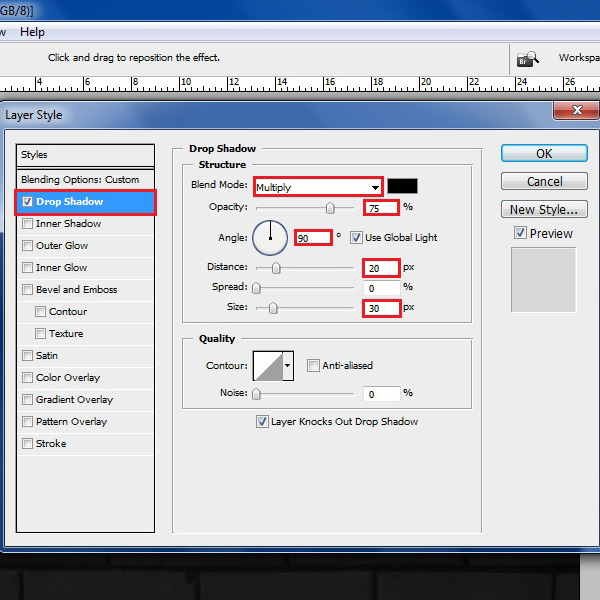
Step # 17 – Adjust the Drop Shadow Settings
Go to the “Drop Shadow” tab and choose the “Blend Mode” option to “Multiply” from the menu. Change the “Opacity” option to “75%” and set the “Angle” to “90 degrees”. Now choose the “Distance” option to “20 px” and “Size” option to “30 px”.
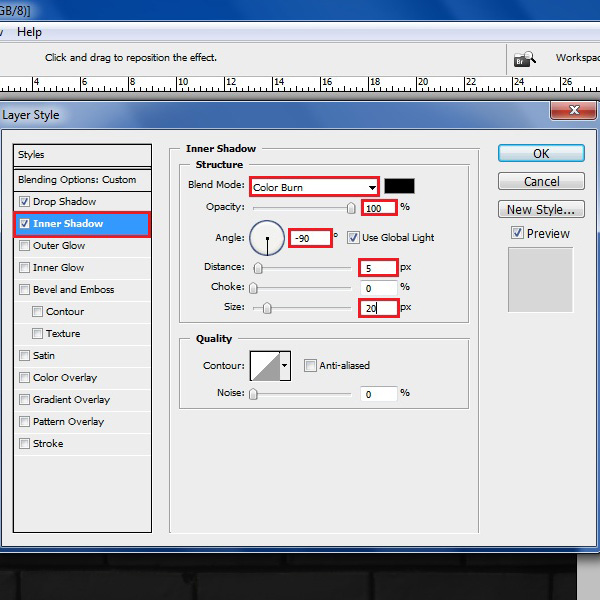
Step # 18 – Adjust the Inner Shadow Settings
Now click on the “Inner Shadow” tab from the menu. In this window, choose the “Blend Mode” option to “Color Burn” and “Opacity” option to “100 %”. Set the “Angle” option to “-90 degrees”, “Distance” option to “5 px” and “Size” option to “20 px”.
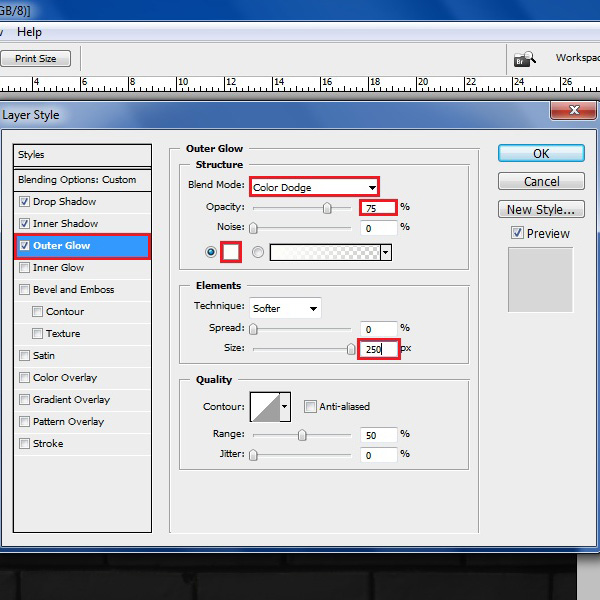
Step # 19 – Adjust the Outer Glow Settings
Now select the “Outer Glow” tab from the menu and choose the “Blend Mode” option to “Color Dodge”. Choose the “Opacity” to “75%”, select the “Color” option as “White” and change the “Size” option to “250 px”.
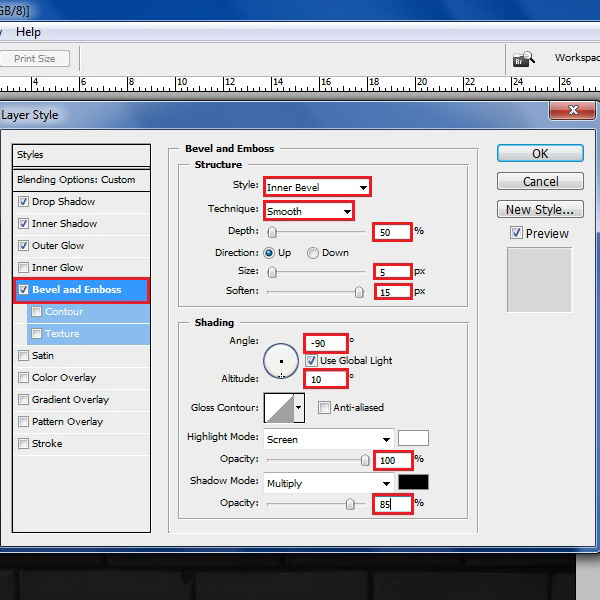
Step # 20 – Adjust the Bevel and Emboss Settings
Now select the “Bevel and Emboss” tab from the menu. In this window, choose the “Style” option to “Inner Bevel” and “Technique” option to “Smooth”. Change the “Depth” option to “50 %”, choose the “Size” option to “5 px” and “Soften” option to “15 px”.
Move on towards the “Shading” category and set the “Angle” option to “-90 degrees”. Now choose the “Altitude” option to “10 degrees”, Highlighted mode’s “Opacity” option to “100%” and Shadow mode’s “Opacity” option to “85%”.
Step # 21 – Adjust the Color Overlay Settings
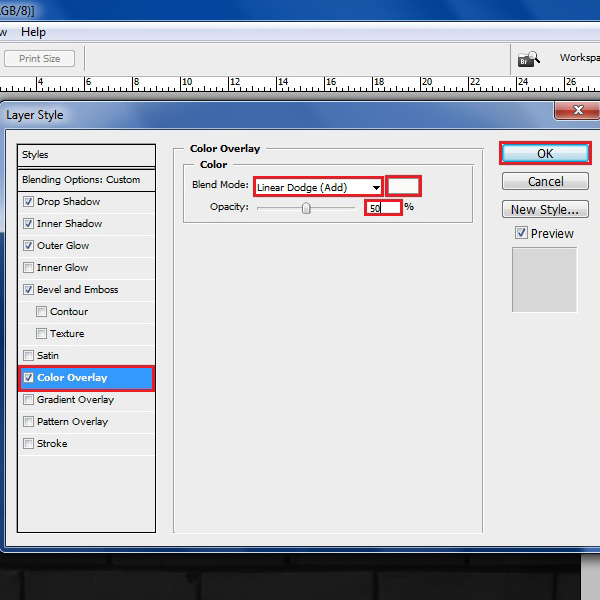
Now Go to the “Color Overlay” tab and choose the “Blending Mode” option to “Linear Dodge (Add)”. Choose the “Color” option to “White” and change the “Opacity” option to “50%”.
After completing these settings, click on the “OK” button to apply the changes on the layer.
Step # 22 – Change the Opacity
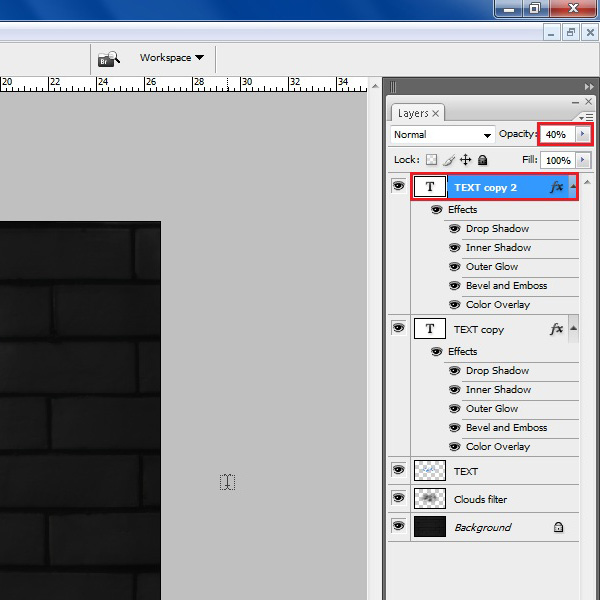
Now duplicate the “Text copy” layer which is available on top in the layer’s panel. After creating a copy of this layer, change its “Opacity” to “40%” and make another duplicate of this layer.
Step # 23 – Clear the Layer Style
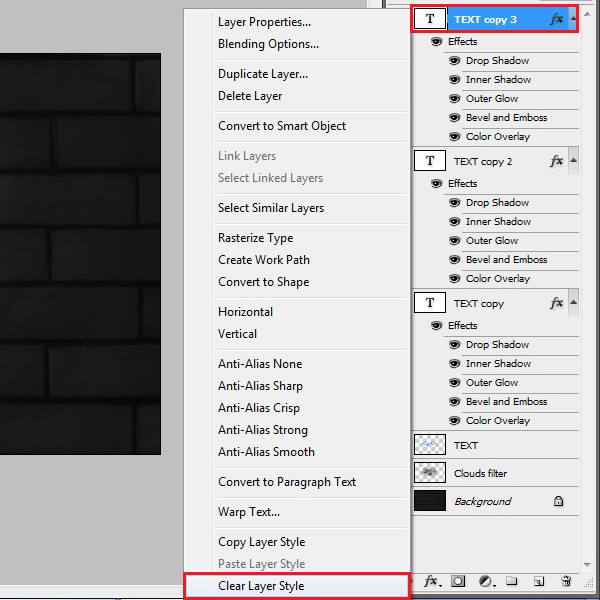
Select the newly created layer and right click on it. Select the “Clear Layer Style” option from the menu to clear all the effects on this layer.
Step # 24 – Apply a Gaussian Blur
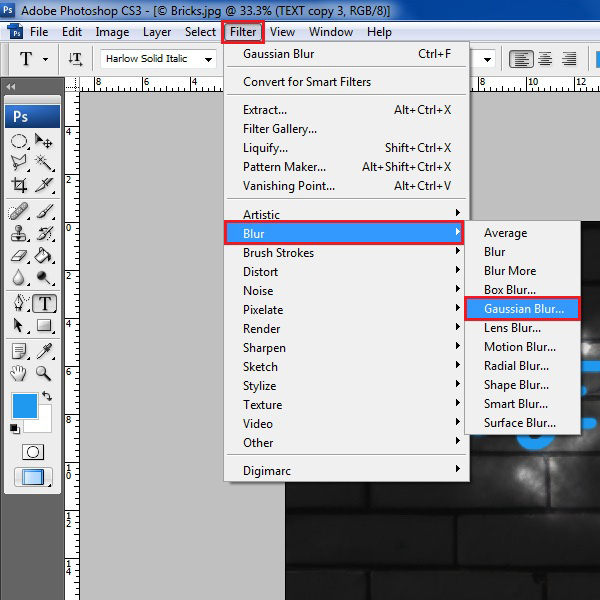
Go to the “Filter” menu and click on the “Blur” option from the list. Select the “Gaussian Blur” filter from the menu to apply it on the layer.
Step # 25 – Choose the Radius
In the Gaussian Blur filter mode, choose the “Radius” to “100 pixels” and click on the “OK” button to apply it.
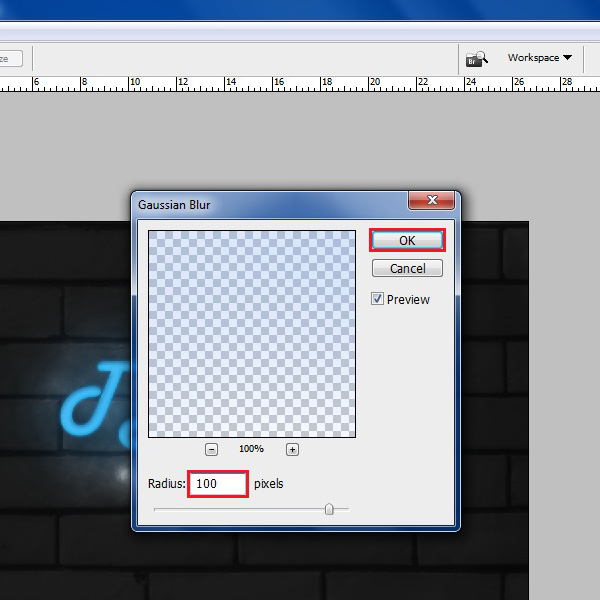
Step # 26 – Change the Blending Mode
Now change the “Blending mode” of this new layer to “Color dodge” by selecting it from the menu.
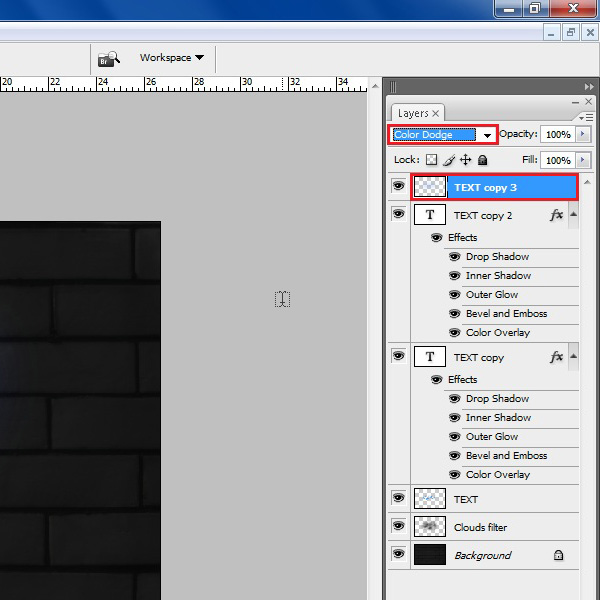
Step # 27 – Create a Connections Layer
Now insert a new layer and change its name to “Connections”. Select this layer and move it below the “Text” layer.
Now select the “Brush” tool from the menu.
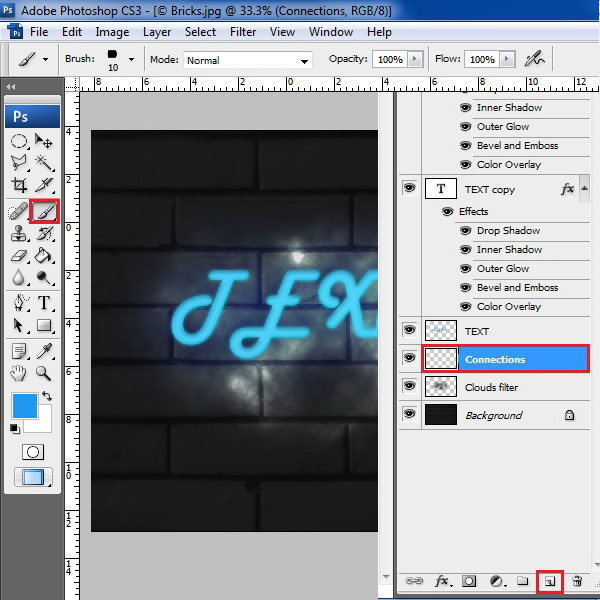
Step # 28 – Apply a Brush on the layer
After selecting the “Brush” tool from the menu, change its “Diameter” to “30 px” and “Hardness” option to “100%”. Now change the “Foreground” color to “Black” and paint small spots on the text towards the wall. Make two connections for each character.
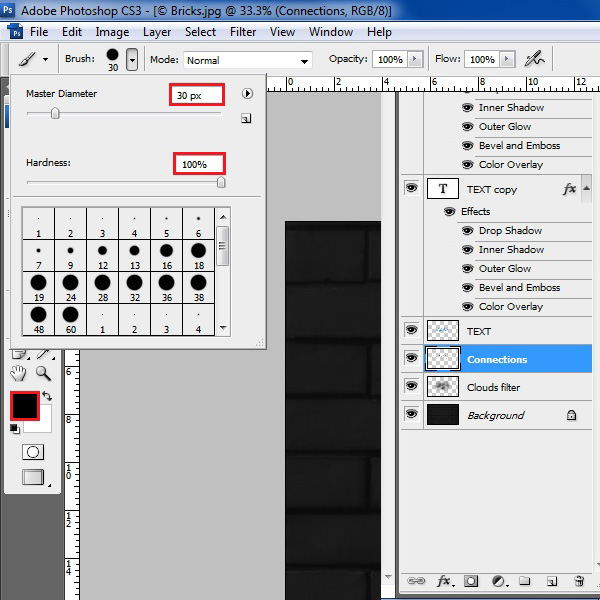
Step # 29 – Open the Blending Options
Now right click on the “Connections” layer and select the “Blending Options” from the menu.
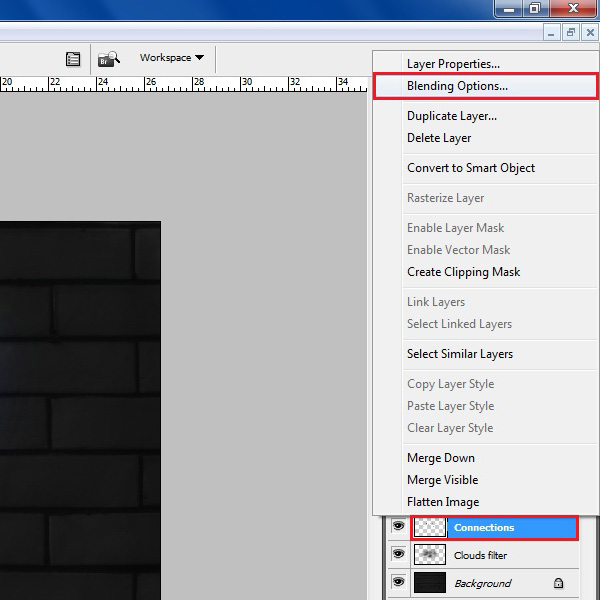
Step # 30 – Adjust the Bevel and Emboss Settings
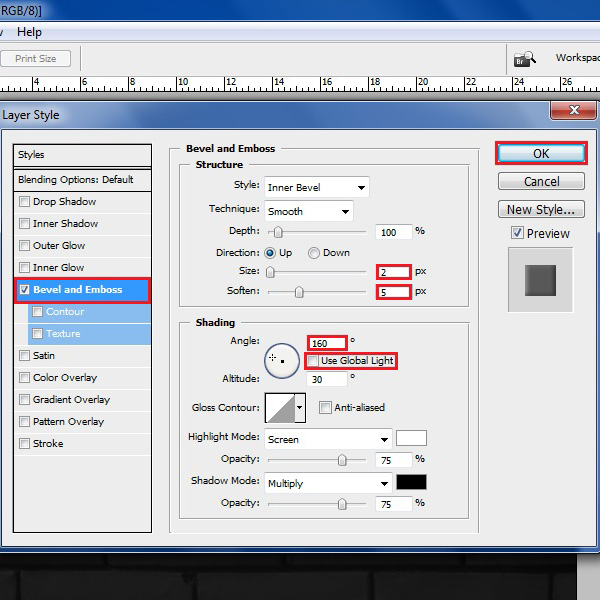
Now go to the “Bevel and Emboss” tab and disable the “Global light” option. Set the “Angle” option to “160 degrees”, choose the “Size” option to “2 px” and “Soften” option to “5 px”.
After completing these changes, click on the “OK” button to apply these settings on the layer.
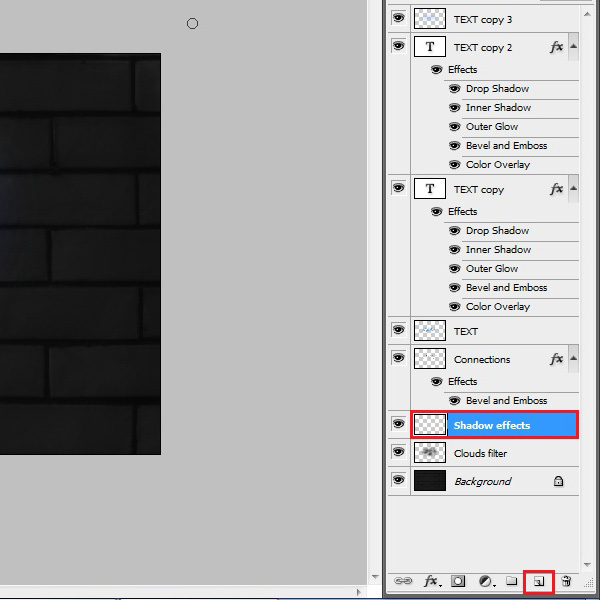
Step # 31 – Create a Shadow Effects Layer
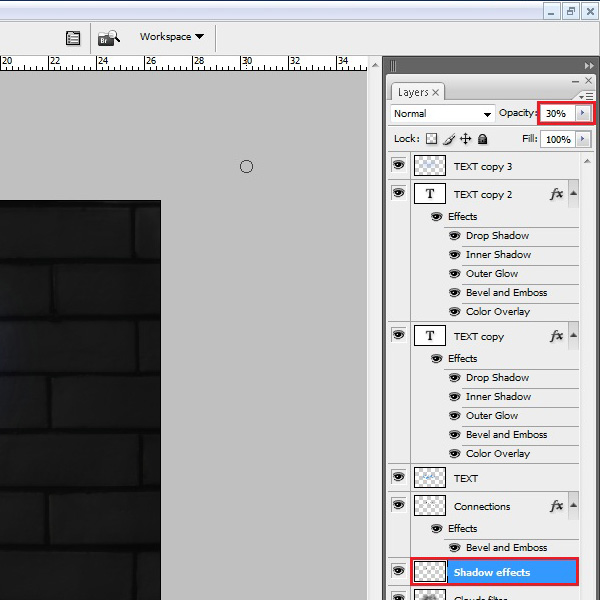
Now add another layer and change its name to “Shadow Effects”. Select this newly created layer and move it below the “Connections” layer on the layer’s panel.
Step # 32 – Apply a Brush Tool on the layer
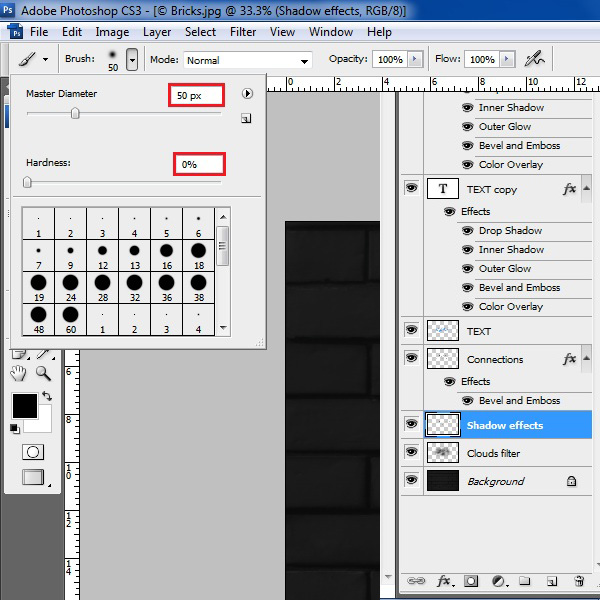
Now select the “Brush” tool from the menu, change its “Diameter” to “50 px” and “Hardness” to “0%”. Apply the brush over the connection marks.
Step # 33 – Change the Opacity of the layer
In the final step, change the “Opacity” of this layer to “30 %” and now the “Neon Effect” is completed successfully.
 Home
Home