Drop shadow for text is a simple feature in Photoshop, but as you might expect with such a complex program, there are many different options associated with it.
Step # 1 – Adding the Text for a Drop Shadow
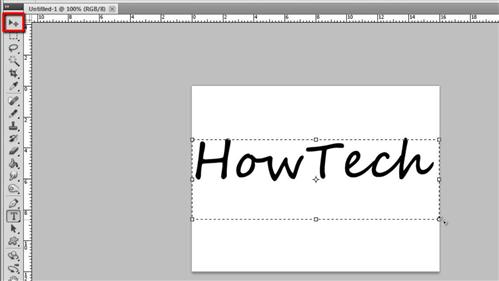
Create a new Photoshop document – here we are choosing the default Photoshop size but you can specify any size you wish. Now we are going to want to place some text on the page, click the text icon in the menu on the left, choose a size, color and font for your text. Here we are using “Segoe Script” with a size of “90” and the color black. Now drag a text box onto the canvas and enter the text you want to add a drop shadow to. Use the move tool to position the text onto the center of the canvas.

Step # 2 – Applying a Basic Drop Shadow
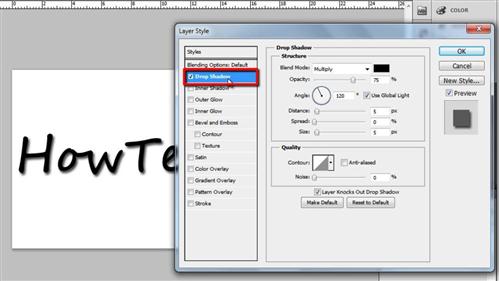
Now, double click on the text layer and the “Layer Style” window will appear. Click on the “Drop Shadow” tab on the left and the text will be given a drop shadow and that is essentially how to create a drop shadow for text in Photoshop. Let us now have a look at some of the ways that this drop shadow can be customized.

Step # 3 – Customizing Your Shadow Effect
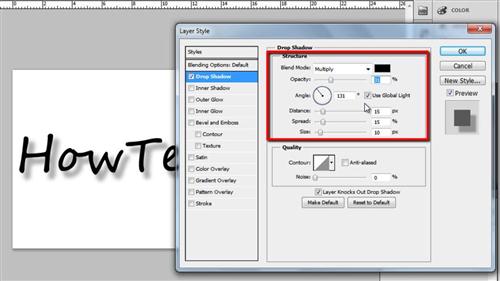
The “Structure” panel on the right is what will allow interesting modifications. It’s best to play around with these to get the setting you desire. What most of the functions to is quite obvious, as you can see “Distance” moves the shadow further away from (or closer to) the text, “Spread” makes the shadow larger or smaller, and “Size” is useful for adjusting the definition of the shadow. “Angle” will adjust the location of the simulated light source. “Opacity” adjusts just the opacity of the shadow and not the text itself. Using these customizable features you should easily be able to achieve the shadow effect that you want – click “OK” to apply any changes.

 Home
Home