This tutorial will show you how to blur edges photoshop which can be useful if you are using your photograph in some form of publication.
Step # 1 – Creating an Adjustment Layer
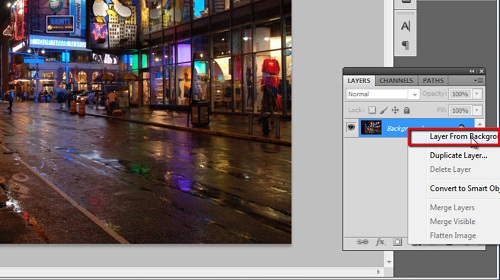
Make sure that you have the photo loaded that you want to blur the edges on. In the layers window on the right, right click on the background layer and click “Layer from Background”. In the window that appears click “OK”.

Step # 2 – Making a Selection
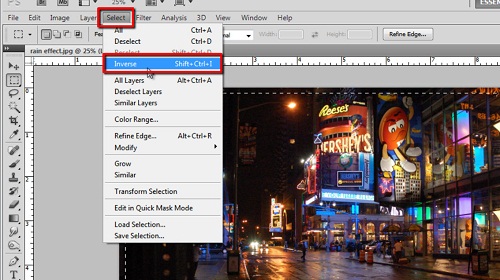
In the menu on the left select the rectangular marquee tool and draw a border around the photograph. The border should be larger if you want a greater blur. Now, click “Select” in the main menu and then “Inverse”.

Step # 3 – Experimenting with Feather Levels
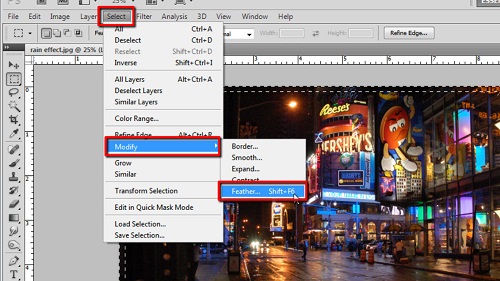
Click “Select”, navigate to “Modify” and then click “Feather”. The “Feather Selection” window will open and you will need to choose a “Feather Radius”. What you enter will depend on the resolution of your photograph and will require some experimentation. Let’s try “10 pixels” to start. Click “OK”. Now hit the “Delete” key and the blur will appear around the image. It is too sharp here, so press “Control” and “Z” to undo. Navigate back to “Feather Selection” and choose a larger pixel count, let’s go for “50”. Click “OK” and press “Delete” again. This time it looks much better and we have a bigger and more effective blur. That is the simple process for learning how to blur edges photoshop.

 Home
Home