With Photoshop you can create basic elements from scratch, adding realistic elements to your design to the canvas. For this tutorial we would be using nothing but basic image manipulation techniques and simple Photoshop effects.
Follow this step by step Photoshop tutorial and learn how to create a duct tape effect in Photoshop.
Step # 1 – Open a Blank Document
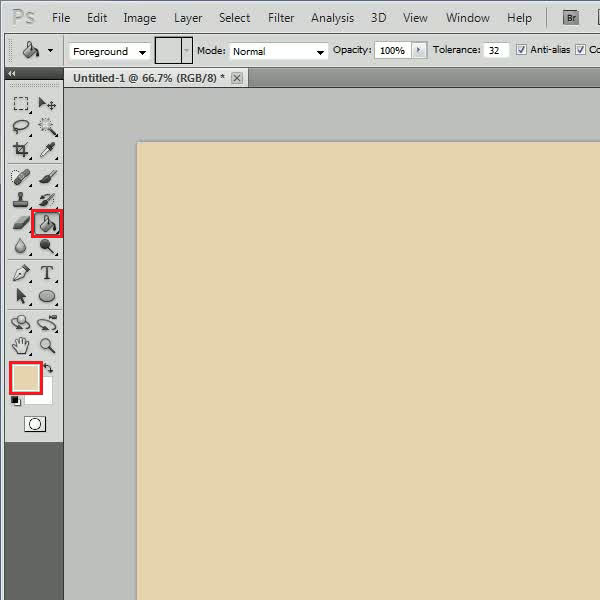
In the first step, launch Adobe Photoshop and open a new document. Now select the “Paint Bucket” tool from the menu which is available at the left corner of the window. After selecting it, choose a light brown color for the fill. Enter in “e8d4af” for the color code. Now apply this color on the page.
Step # 2 – Apply the Noise Filter
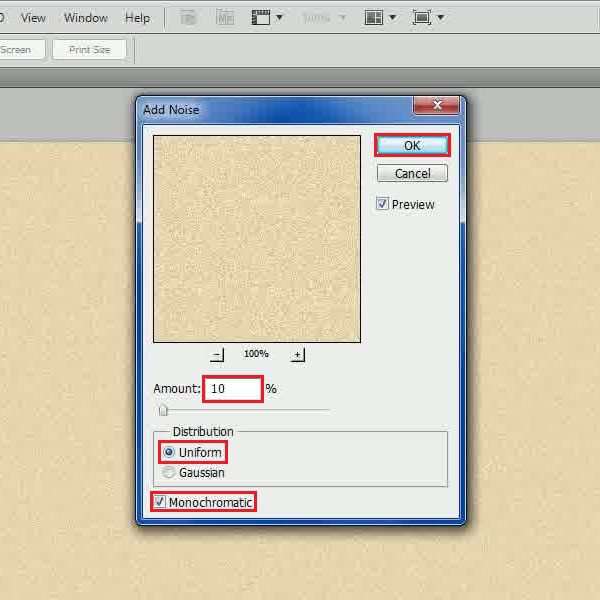
In the next step, go to the “Filter” menu, select “Noise” and click on the “Add Noise” filter option from the list. In the filter settings panel, set the “Amount” to “10 percent” and select the “Uniform” and “Monochromatic” options at the bottom. After changing these values, click on the “OK” button to apply the filter on the image.
Step # 3 – Draw a Rectangular Shape
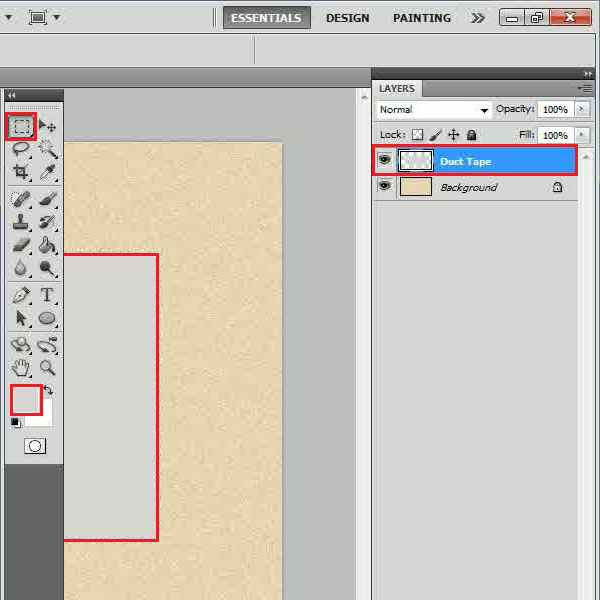
After applying the filter, add a new layer and change the name of the layer to “Duct Tape”. In this layer, select the “Rectangular Marquee” tool from the menu and draw a rectangular shape on the canvas. Now choose a grey color for the fill and press the “ALT + BACKSPACE” key on the keyboard to fill up the selection.
Step # 4 – Apply the Noise Filter
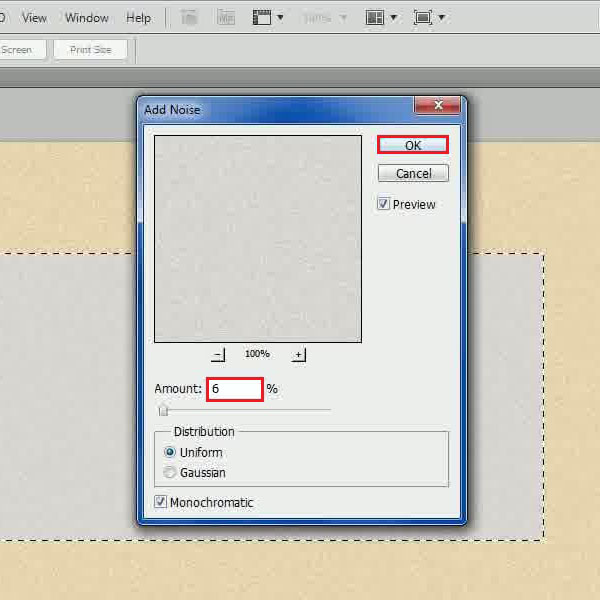
Now go to the “Filter” menu, select “Noise” and click on the “Add Noise” filter option from the list. In the filter settings panel, set the “Amount” to “6 percent”. Leave the rest of the settings as it is and click on the “OK” button to apply this filter on the image.
Step # 5 – Apply the Texture Filter
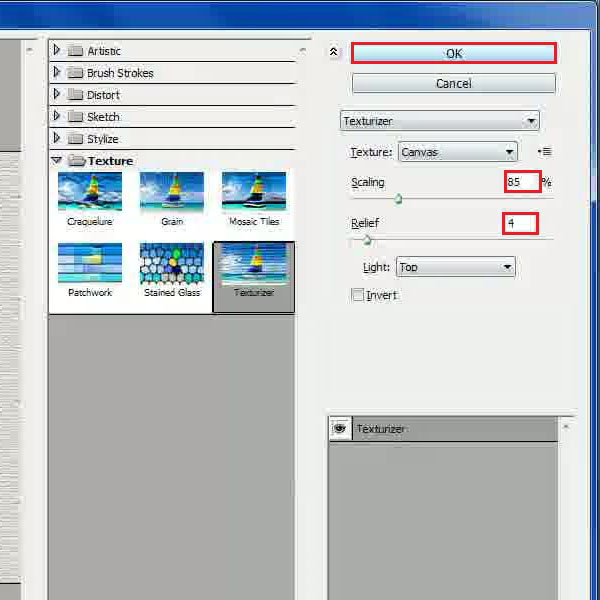
After applying the noise filter, go to the “Filter” menu again, select “Texture” and click on the “Texturizer” filter option from the list. In the filter settings panel, set the “Scaling” option to “85 percent” and “Relief” to “4”. After changing these values, click on the “OK” button to apply this filter on the image.
Step # 6 – Adjust the Opacity
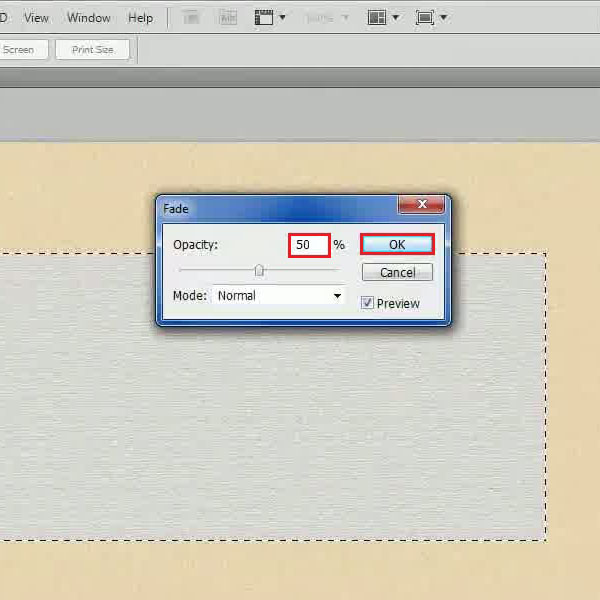
Now go to the “Edit” menu and select the “Fade Texturizer” option from the list. In the fade settings panel, set the “Opacity” to “50 percent” and click on the “OK” button to apply it on the image.
Step # 7 – Adjust the Bevel and Emboss Settings
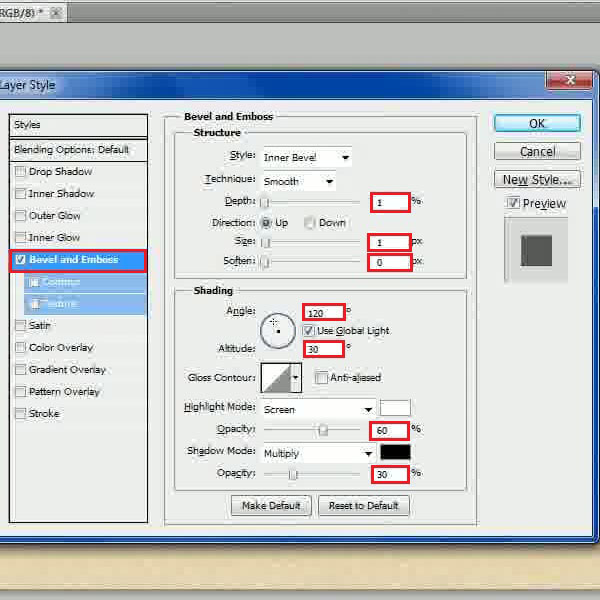
In the next step, right click on the “Duct Tape” layer and select the “Blending option” from the menu. Once the settings panel opens up, go to the “Bevel and Emboss” tab. Now set the “Depth” to “1 percent”, “Size” to “1 px” and “Soften” to “1 px”. After this, set the “Angle” to “120 degrees”, “Altitude” to “30 degrees”, Highlight mode’s “Opacity” to “60 percent” and Shadow mode’s “Opacity” to “30 percent”.
Step # 8 – Adjust the Texture Settings
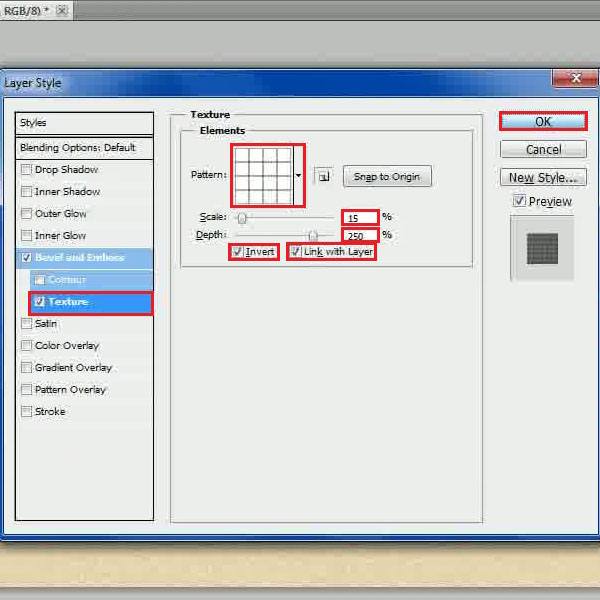
Move over to the “Texture” tab; set the “Pattern” to “Tiles Smooth”, “Scale” to “15 percent” and the “Depth” to “250 percent”. Now select the “Link with layer” and the “Invert” options. After changing these values, click on the “OK” button to apply these settings on the image.
Step # 9 – Use the Lasso Tool
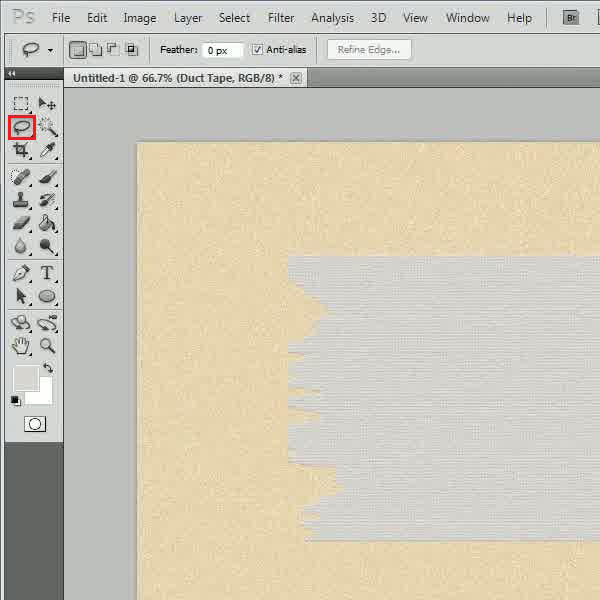
Pick up the “Lasso” tool from the menu and select the edges of the rectangular shape. Make sure you make an irregular selection to add details to the effect. After selecting it, press the “DEL” key on the keyboard to remove the selected area.
Step # 10 – Create a Wrinkle Layer
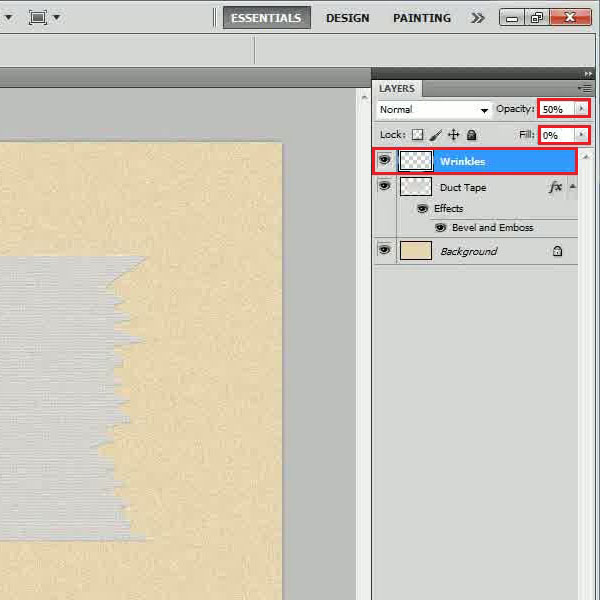
Now insert a new layer and change the name of this layer to “Wrinkles”. After creating it, change the “Opacity” of this layer to “50 percent” and “Fill” to “0 percent”.
Step # 11 – Adjust the Bevel and Emboss Settings
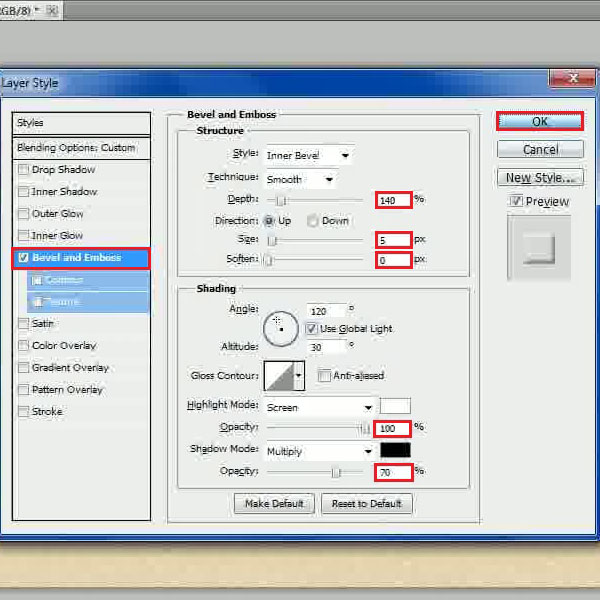
Now right click on this layer and select the “Blending option” from the menu. Once the settings panel opens up, click on the “Bevel and Emboss” tab. In this tab, set the “Depth” to “140 percent”, “Size” to “5 px”, “Soften” to “0 px”, Highlight mode’s “Opacity” to “100 percent” and Shadow mode’s “Opacity” to “70 percent”. After changing these values, click on the “OK” button to apply these changes on the layer.
Step # 12 – Create Some Wrinkles
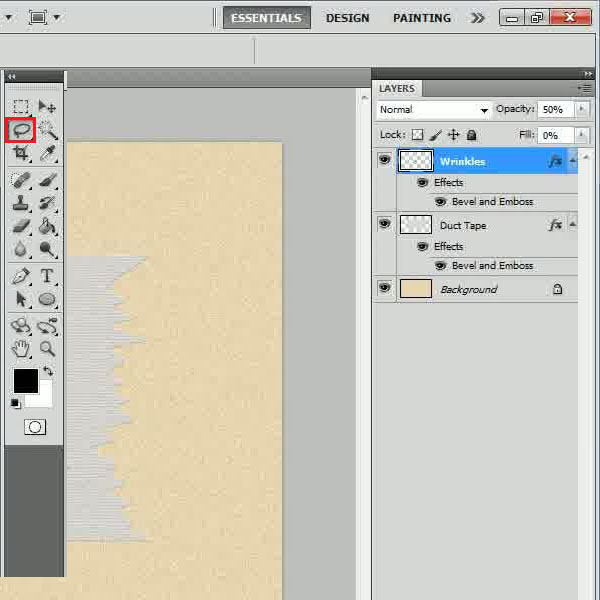
Change the “Foreground” color by pressing the “D” key on the keyboard. Now select the “Lasso” tool from the menu. Start creating wrinkles on this layer by making thin lines and filling them with the foreground color by pressing the “ALT + Backspace” key on the keyboard.
Step # 13 – Add a Text Layer
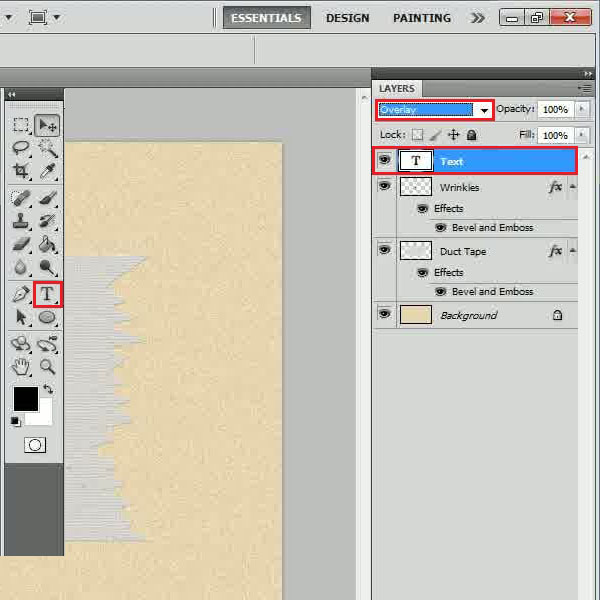
Now add a new layer and change the name of this layer to “Text”. Select the “Text” tool from the menu and insert your desired text in this layer. After entering the text, change the “Blending mode” of this layer to “Overlay”.
Step # 14 – Adjust the Size and Placement
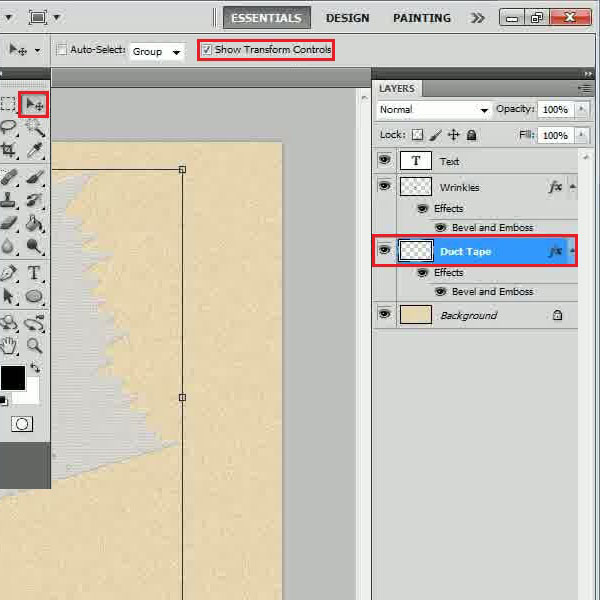
In the last step, select the “Duct Tape” layer and click on the “Show Transform Controls” option from the menu. Now adjust its size and placement according to the background and that’s it.
 Home
Home