In this tutorial, you will learn how to create a sin city effect in Photoshop.
Step 1 – Duplicating the layer
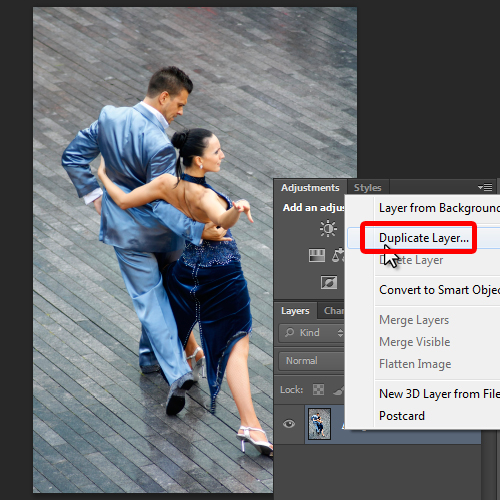
For this tutorial, we will be working on this free stock image over here. You can download the image from the following link:
http://www.stockvault.net/photo/127910/the-dancers
So let’s get started by duplicating the layer first.
For that, move to the layer panel, select the image layer and right-click on it. From the options, select “Duplicate layer” from the list. This will create a copy of the same layer.
Step 2 – Adding the Black and White Filter
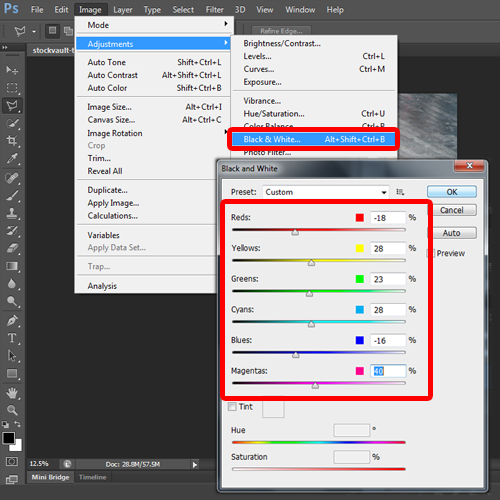
Next, we will go to the Image menu, move over to Adjustments and select the “black & white” option. Over here, we will adjust the settings to give a black and white effect to the image. So let’s start by reducing the Reds to -18%, Yellows to 28%, Greens to 23% and Cyan to 28%. The thing is, we want deeper blacks for the image, therefore we will be reducing the Blues to -16% and Magentas to 40% as well.
Step 3 – Adding the Curves Adjustment Filter
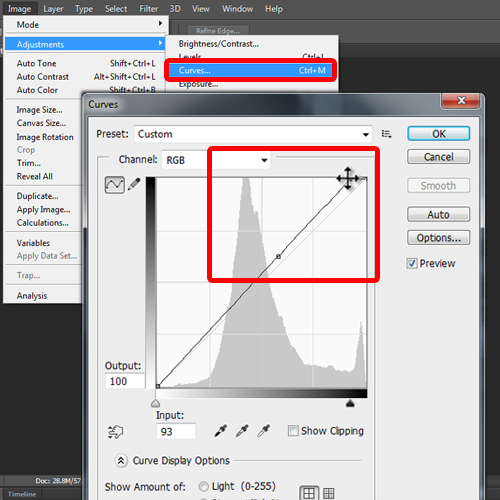
Now it’s close to what we want but still not quite there yet. In order to handle the color variation more closely, we will add the curves adjustment to the layer. For that, let’s go to the image menu, move over to adjustments and select the “curves” option. Now we will adjust the graph accordingly.
To darken the objects which were focusing on, we will go to the top of the graph and move the placeholder a bit towards the left side. With that done, let’s click on OK to close the window.
Step 4 – Adding the Levels adjustment filter
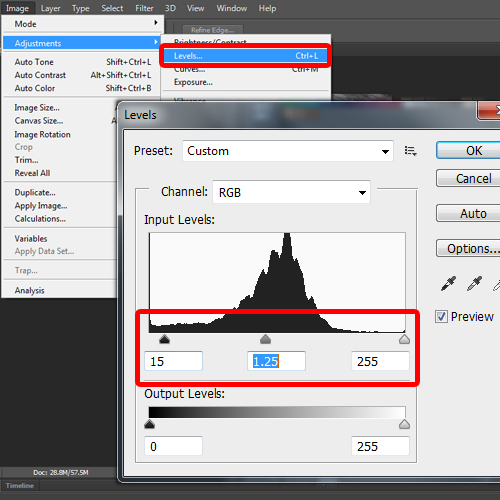
Now the main objects are exactly like how we want them, but the backdrop is a bit darkened. For that, we will add a levels adjustment to the layer. For that, go to the Image menu once more, move over to Adjustments and click on the Levels option. Over here, change the shadows to 15 and mid-tones to 1.25 respectively. It must be kept in mind that these values would differ according to the image you are using here.
Step 5 – Adding the Hue/Saturation adjustment filter
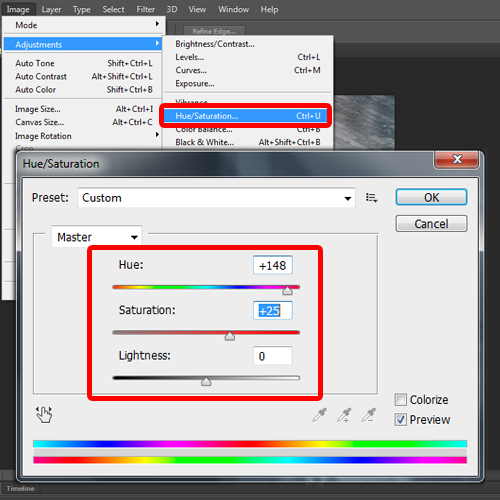
Next, from the layer panel, we will make another duplicate of the original layer and move it to the top. Now, let’s go to the image menu, move over to adjustments and select the “Hue/Saturation” option. Over here, we will select a reddish hue and increase the saturation of the image as well. For this image, we kept +148 for the Hue and increased the Saturation to +25. You can experiment with different values according to your image.
Step 6 – Removing the color from the image
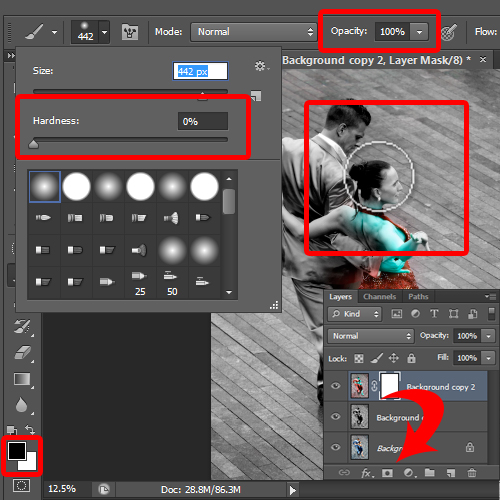
Now we will create a layer mask on this layer and pick up the brush tool. Make sure you keep the opacity of the brush to 100% and pick up a soft brush with hardness set to 0%. Before applying the brush on the layer, make sure that the layer mask is selected and that you have black color set as the foreground color. Now simply start applying the brush over the background. For this image, we will leave the color of the dress as it is and apply the brush over the rest of the image.
When dealing with edges, make sure you apply the brush tool carefully. You can zoom in the image, decrease the size of the brush and avoid applying the brush over the part which you want to keep as colored.
And that’s basically how you can create a sin city effect in Photoshop.
 Home
Home