Photoshop is a powerful program for improving the appearance of a photograph. Learning how to set white balance in photoshop is a simple way to improve the quality of your photos.
Step # 1 – Choosing an Appropriate Photo
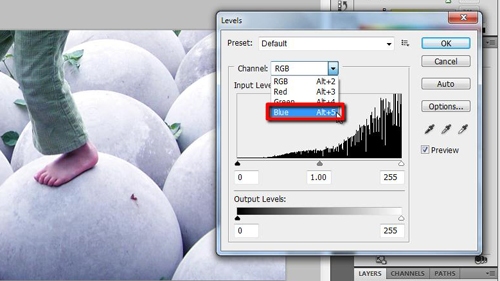
First, start Photoshop and open the image that you want to edit. If you are learning how to set white balance in photoshop it’s best to choose a photograph where the white is not perfect. In this example, we can see that the photograph is too blue overall – the balls should be white, not blue.

Step # 2 – Opening Levels
Now, in order to remove this blue tinge from the photo we need to open the “Levels” window. In the menu click “Image” then navigate to “Adjustments” and click the “Levels…” option.

Step # 3 – Choosing the Right Channel
In the “Levels” window you will see the “Channel” option. As a default it is set to “RGB” which stands for Red Green Blue. Click the drop down arrow and select the color that you want to reduce in the image, in this case “Blue”.

Step # 4 – Using the Slider to Adjust the Color
Below the “Input levels” graph you will see a slider. Click on the middle pivot and drag it along the slider, you will see that the image live updates to the new settings. Move this pivot until the image looks more natural. Once you are happy with the result, click “OK” and the changes to the image will be applied.

 Home
Home