In this tutorial, we will teach you how to add different style and filters to a clip in Adobe Premiere. For this tutorial, we will be adding film saturated color themed video effects where the subject will be more focused than the surrounding.
Step 1 – Applying the calculations effect
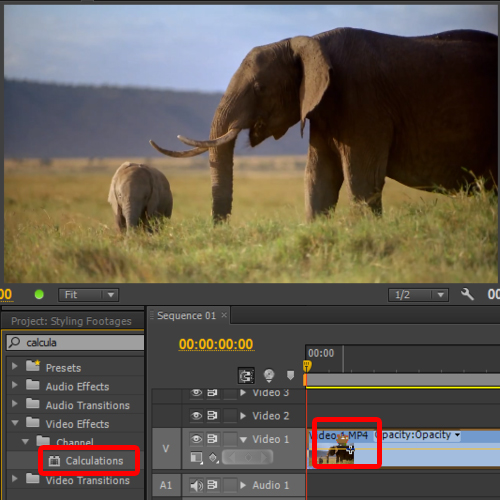
For this tutorial, we will be working with this wildlife footage. Here we have a female elephant standing near her baby which is portraying the natural relation between a mother with her child. So let’s add a little depth to the scene by adding different adobe premiere effects.
For that, go to the effect panel and type “Calculations”. From the results, you can see the effect within the Channel category. Simply drag and drop the effect on the video layer.

Step 2 – Configuring the option
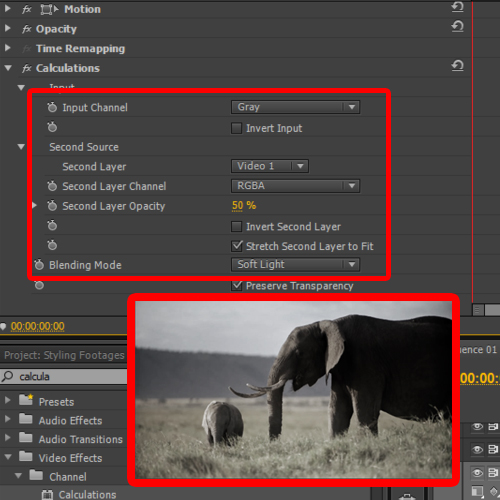
Now move to the effect control panel and configure the effect. For example, here we will select the gray option from the input channel which will convert the whole footage into gray scale mode. Now, move to the second layer channel and select the RGBA option from the menu. This will blend the second layer channel with the original input channel.
Make sure that Video 1 is selected from the Second layer option to determine the effect source. Now let’s reduce the second layers opacity to 50% in order to saturate the scene with the original footage.
Next, move to the blending mode. Here you will see a long list of presets to choose from for example soft light or color burn etc. The blending mode determines how the footage is affected by the presets. Like in this case, we will use the soft light option so that the colors values darken according to the original clip.

Step 3 – Making an outro
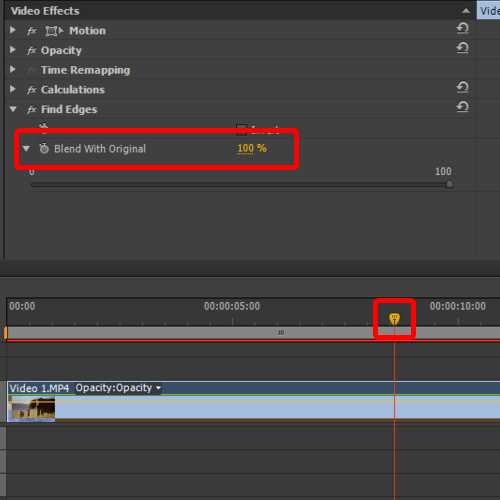
Once done, apply the find edges video effect from the video effects menu. Here, we will first set the blend with original option to 100% and click on the toggle animation button to animate the filter. With that done, you can move the seek bar at the end of the clip and set the blend with original option to 40%.

Step 4 – Setting Fade in and Fade Out Values
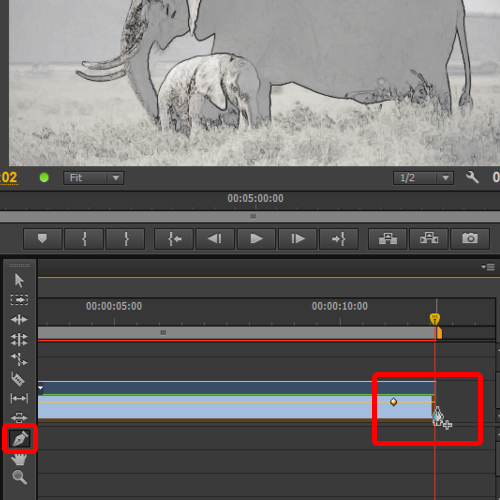
Next, we will add the key frames by selecting the pen tool and adding key frames both at the beginning and at the end of the sequence. For example, here we will add two points, one right at the beginning and the other after a little gap. After that, we will take the very first key frame and pull it down. This will give a fade in effect. The same is to be done for the ending to give a fade out effect.
With that taken care of, our effect is complete. You can now render the sequence and see how the combination of different adobe premiere effects has added depth to your clip.

 Home
Home