In this tutorial, we will teach you how to make vampire teeth in Photoshop.
For this tutorial we will be working on a free stock image which can be downloaded from the following link:
http://www.sxc.hu/photo/545371
For this tutorial, we have already resized the canvas so that only the face of the model is shown.
Before you get started with the tutorial, download the following things which are going to be used in the artwork:
Silver Chinchilla:
http://www.sxc.hu/browse.phtml?f=view&id=1331600
Splash Background:
http://www.sxc.hu/browse.phtml?f=view&id=1161839
Step 1 – Black and White Adjustment Layer
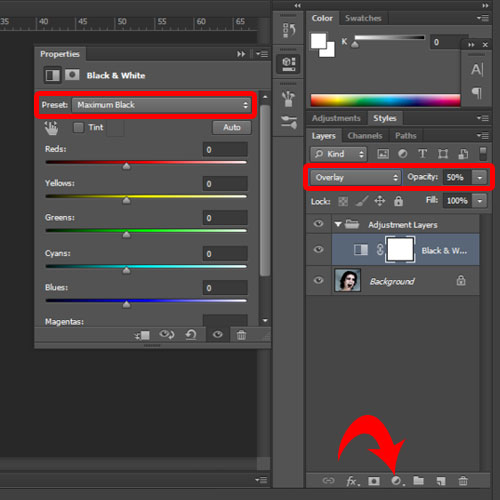
First of all, we will add 4 adjustment layers. Let’s start by first adding the Black and White adjustment layer. From the presets panel, make sure you choose the maximum Black option. With that done, reduce the opacity to 50 percent and change the blend mode of the layer to Overlay.
Step 2 – Hue and Saturation Adjustment
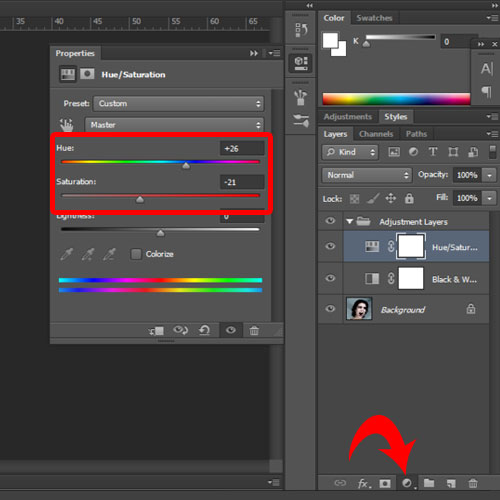
Next, we will add the Hue and Saturation layer. Over here, we will keep the Hue value to +26 and saturation to -21.
Step 3 – Levels Adjustment
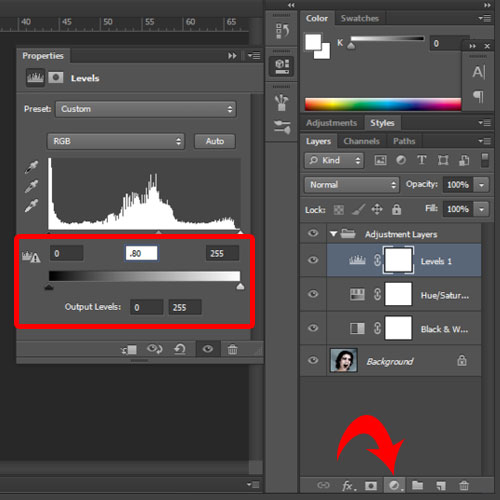
With that done, we will add the Levels adjustment layer and will only change the middle value to 0.80.
Step 4 – Gradient Map
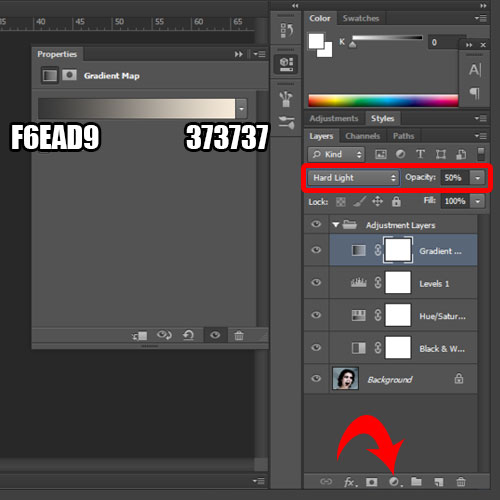
Last of all we will add the gradient map adjustment layer and choose 373737 for the left side and f6ead9 for the right side gradient. With that done, we will reduce the opacity of the layer to 50 percent and change the blend mode to Hard Light.
Now, we are basically done with the adjustment layers and it’s time to move on to the eyes.
Step 5 – Replacing the Eyes
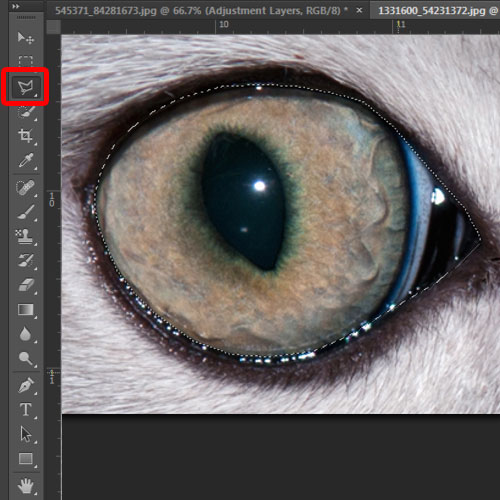
For this tutorial, we will be using cat eyes. Open up the Silver Chinchilla image and pick up the polygonal lasso tool to make a selection of the eyes. Once done, copy and paste the selection on to a new layer.
Do the same for the other eye as well, duplicate both the layers and bring them on the original document.
Step 6 – Merging the cat eyes with the image
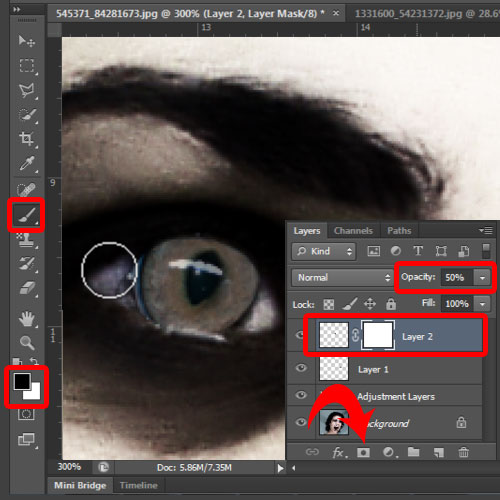
Over here, we will resize the cat eyes and position them on the eyes of the model.
With that done, let’s decrease the opacity of the layer to 50 percent so that we can see what’s behind the image. Next, we are going to add a layer mask. After that, we will pick up the brush tool, make sure that the black color is selected for the foreground and apply the brush on the sides of the eye to erase it.
We can use the eraser tool for this but there is no going back once the eraser tool is applied. This is a non-destructive way of editing in Photoshop, and in case you want to change something later on, you can always edit the layer mask.
We will do the same thing for the other eye as well. You can change the opacity back to 100% when you’re done.
Step 7 – Adding Layer Style to the Eyes
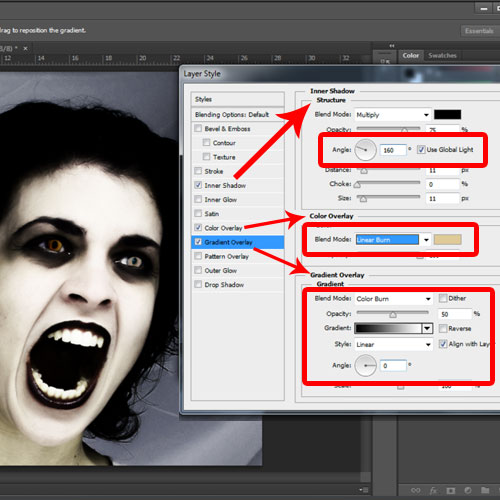
Once done, let’s open up the layer style options.
Over here, we will first apply the Inner Shadow option. We will keep all the options as it is except the angle. Change the angle to 160 degrees and move to the color overlay tab. Over here, we will choose dfca98 for the color fill and change the blend mode to linear burn. Next, we will move to the gradient overlay option, change the blend mode to color burn, reduce the opacity to 50 percent and change the angle to 0 degrees.
Once done, we will copy the layer style and paste it on the layer which has the other eye. You can make further changes, experiment with different values here to see what would look better.
Step 8 – Working on the background
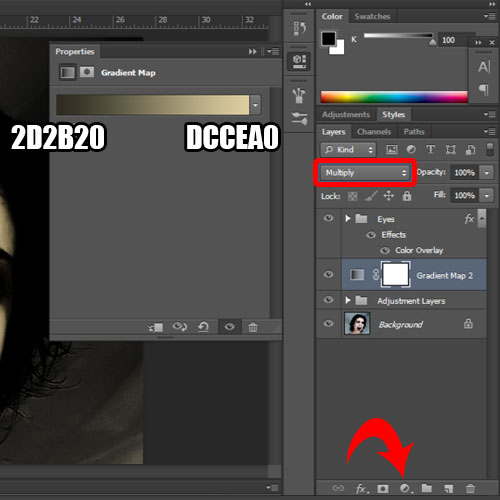
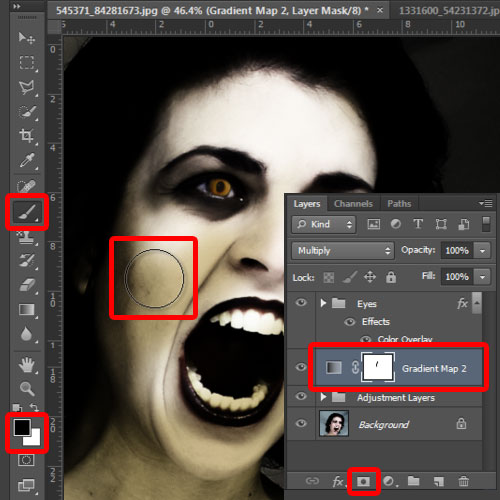
Now let’s change the color of the background. For that, we will add a gradient map adjustment layer and choose 2d2b20 for the left side and dccea0 for the right. With that taken care of, change the blend mode of the layer to Multiply.
Step 9 – Removing color from the Face
Since we want to change the color of the background only, we will enter the layer mask, pick up the brush tool with black color selected for the foreground color and apply it over the face.
Step 10 – Blending the face with the background
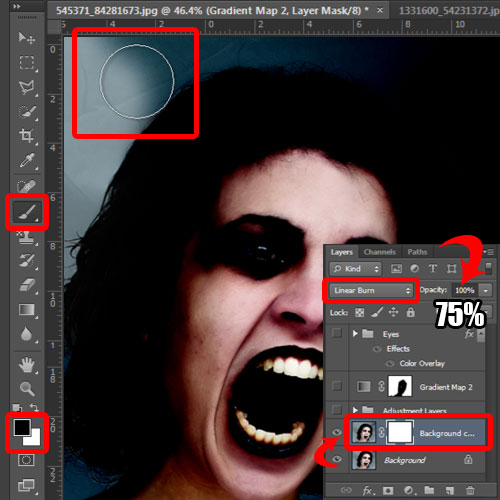
With that taken care of, let’s start adding effects to the face. For that, duplicate the original layer and hide the rest of the layers. Now change the blend mode of the duplicated layer to linear burn and add a layer mask. With that taken care of, we will pick up the brush tool once more and apply black color over the background. Make sure you have the layer mask selected while applying the brush over the layer otherwise you will be just adding black color over the canvas.
Be careful of the edges. You can increase the hardness of the brush to a 100 percent to remove the edges completely. Once done, reduce the opacity of the layer to 75 percent and unhide the rest of the layers.
Step 11 – Adding effects to the face
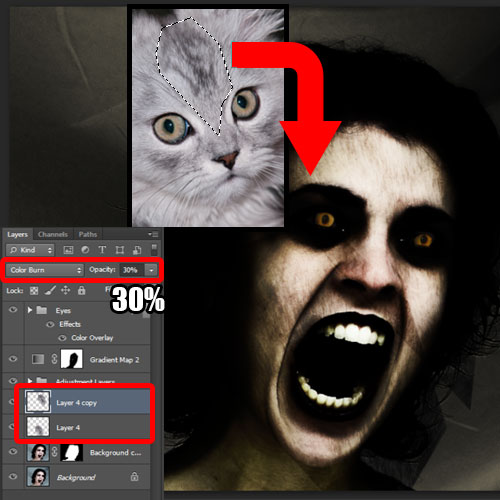
It’s important to try different things and use them in your artwork. Remember the cat image? We have made a selection of the forehead of the cat here using the polygonal lasso tool and brought it on the document we are working on. We will manipulate this layer to add effects to the face. For that, let’s position the layer below the adjustment layers folder. With that taken care of, we will move the layer towards the bottom of the face and change the blend mode to color burn while reducing the opacity to 30 percent.
You can duplicate the layer and position it on the face multiple times. Next we will add layer masks to both the layers and use the brush tool to apply black color over the parts which we want to remove. Since we made a selection with feather set to 0, the selection has a few sharp edges, as you can see in the mage below. For that, we will use the brush tool, set the hardness to 0 percent and apply the brush so as to remove the sharp edges which are appearing on the face.
Step 12 – Making the vampire teeth
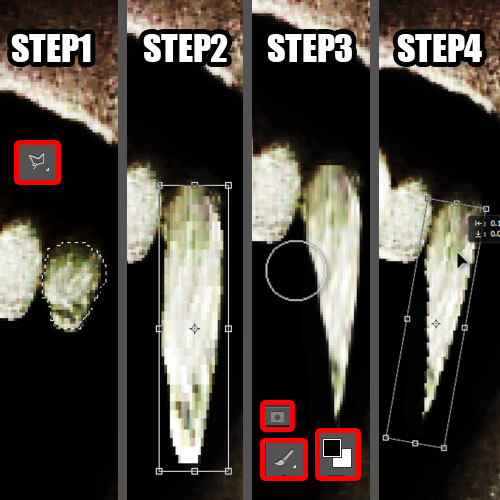
So far, this is what we have come up with. Now it’s time to add the vampire teeth in Photoshop. For that, we will zoom in to the teeth, pick up the polygonal lasso tool and make a selection of the tooth. With that done, let’s copy and paste the selection on to a new layer and let’s increase the size of the tooth horizontally.
After that, we will add a layer mask to the new layer, and apply black color using the brush tool to shape this it into a vampire tooth. Make sure the hardness is set to a 100 percent and then carefully apply the brush around the tooth. Lastly, press CTRL T to activate the transform tool, rotate and position the tooth accordingly. You will have to do the same thing for the other tooth as well.
Step 13 – Removing Blood Splash from background
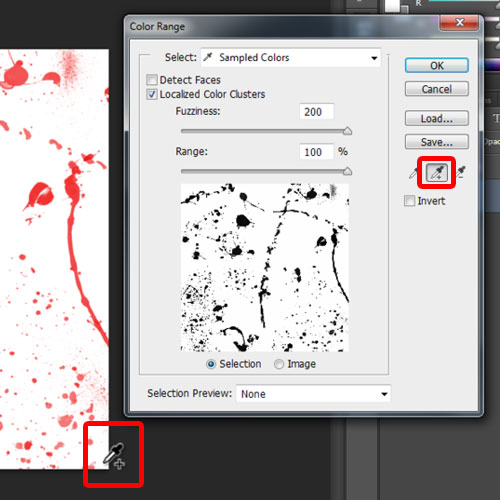
Moving on, now let’s add blood splash images to the document. For that, we will first remove the white background from this layer. So let’s move to the Select menu and click on the color range option. Over here, we will select white color from the background and click on the “add to selection” button. Now we will keep selecting white color from different parts of the canvas to make the selection more clear.
Once done, simply click on okay and the selection will be made. With that done, simply hit delete and only the splash effect would remain. Now we will duplicate the layer and bring it on the document we are currently working on.
Step 14 – Adding blood splashes to the image
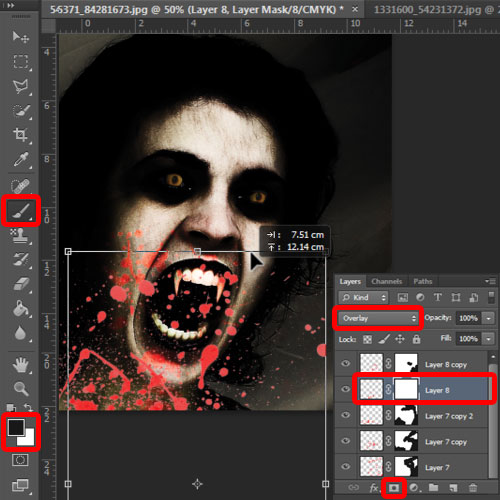
Now we will position the layer so that a particular splash that we want should appear on the face. With that done, simply change the blend mode to overlay. You can duplicate the layer and use different splashes to cover up the face. Try to add some on the teeth as well.
At the end, we will add layer masks to all the splash layers and remove the unnecessary part using the brush tool and applying black color over the layer masks.
You can play around with different ideas, resize the splashes and work with different effects.
And that’s how you can convert a simple portrait into a vampire, adding blood splashes and making vampire teeth in Photoshop.
 Home
Home