Photoshop; is an extremely useful software when it comes to working with pictures and performing some brilliant functions. This software allows one to use different effects for pictures that completely change its appearance by using a variety of tools provided. Even though at first, using Photoshop might look complex and difficult, once one has a crisp and clear understand of how to work with the software, the benefits reaped are numerous and thrilling.
Different tutorials for Photoshop can be seen to learn different effects. In this tutorial we will teach you how to create stencil art in Photoshop.
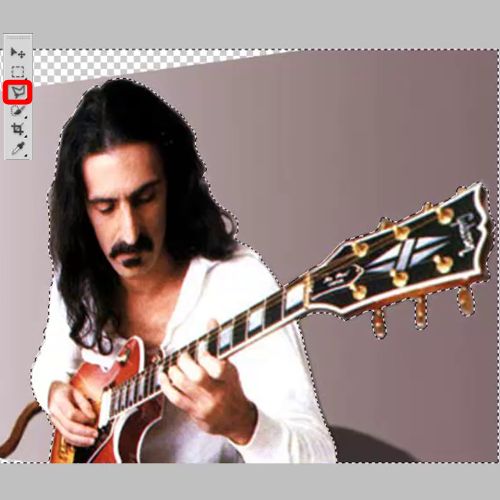
Step 1 – Cropping out the image from the background
In order to start creating stencil art in Photoshop, you must first bring to the canvas, the image that you want to manipulate. In this tutorial we are going to crop out the image of Frank Zappa from the background and give it a little perspective in order to make the image appear slightly different.
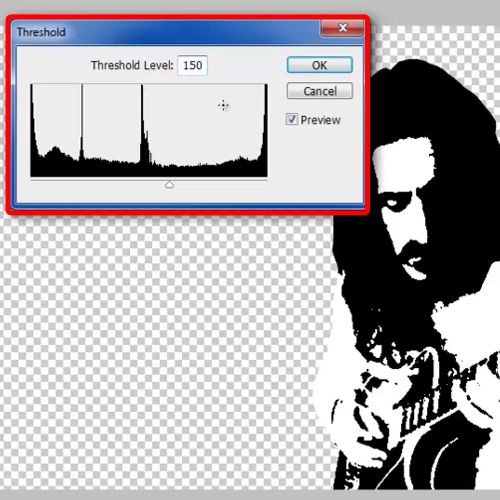
Step 2 – De-saturating the image and adding image adjustments filter
Next, we must de-saturate the layer. In order to do so, you must go to the “Image menu”, move over to “Adjustments” and click on the option titled “threshold”. Here, you must set the threshold to 150, although this filter can vary from image to image. One must ensure they set the right threshold level in order to gain best results.
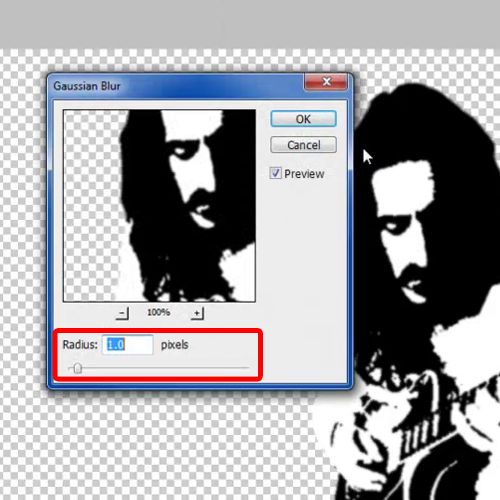
Step 3 – Using the Gaussian Blur Filter
Once the above steps have been completed, go to the filter menu, move over to “blur” and click on the “Gaussian Blur” option. A new pop up window will appear on the front of your screen where you will need to set the radius to be 1 pixel and apply the filter. Changes in the numerical over here should be made very carefully.
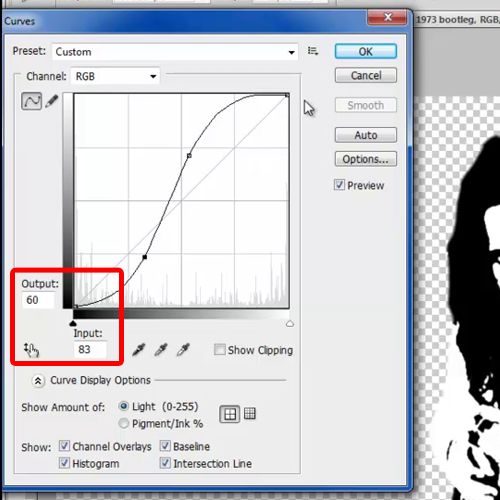
Step 4 – Using the Curves Adjustment Filter
Now open up the Image menu once more. Here you will be required to move over to the option titled “Adjustments” and click on the “curves” option. Set the output to 60 and Input to 83. This filter would vary according to the image. Once this has been done, you must click on the “Ok” button in order to continue.
Step 5 – Applying Final touches and playing with the warp tool
Now the basic structure on the canvas has been finally completed. All that needs to be done now is that you must add a black background, add text and use the warp tool to give a more retrospective effect to the image.
Applying such effect for pictures give your images an absolutely new look, and thus make the changes made stand out when the final result is viewed.
It is important that one gains an understanding of Photoshop, its tools and features before they start working with the software, so that they can attain the best results possible. Thus, this way their actions will be most effective. It is easy to learn them quickly by following different tutorials for Photoshop.
