In this tutorial you will learn how to use color enhancing in Photoshop. Specifically, we will be looking at saturation vs vibrance. Each of these effects has their own use depending on what you’re looking to achieve. It’s true both the Vibrance and Saturation can boost colors overall, but it depends what colors you have in your image and stylistic look you’re aiming to achieve.
Step #1 – Open your image
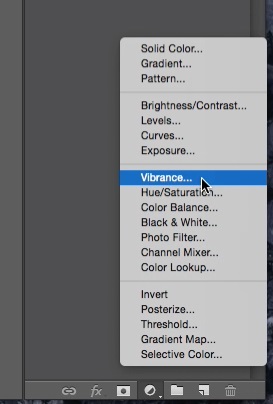
First, right click the image you want to edit, and select open in Photoshop. Then click the adjustment layer icon beneath the layers panel. If for some reason your layout looks different than this, you can reset it by going to Window > Workspace > Essentials. Which is the default workspace.

Step #2 – Select Vibrance
With the adjustment layer menu displayed, select Vibrance. A properties menu then appears where we can adjust the Vibrance and Saturation.

Step #3 – Adjust Vibrance & Saturation amounts
Let’s put the Saturation to 70. As you can see, the photo becomes noticeably more orange, but when we adjust the Vibrance, we can notice a more subtle boost of the colors.

Vibrance doesn’t enhance skin tones such as yellows or oranges. So a picture with people in it, is most likely going to look more natural with vibrance than if you added saturation.

To summarize, a photo with facial tones, yellows and oranges is going to be more dramatically effected by saturation and more subtlety effected by vibrance. In the end though, it’s all a matter of personal preference and the look you’re aiming to achieve.
You have now successfully learned how to color enhance with Saturation and Vibrance in Photoshop.
 Home
Home