Photoshop; is an extremely useful software when it comes to creating photo image effects of your own, or editing existing images in a way which makes them stand out amongst others of its kind. It has wide variety of tools and options available which allow one to continuously keep exploring options that they could use while working on images. Even though using this software may appear to be slightly complex at first, once you gain a clear understanding of how it works, and the result the Photoshop effect produces, you will be delighted.
However, in this tutorial, we will teach you how to change contrast in Photoshop.
Step 1 – Duplicating the layer
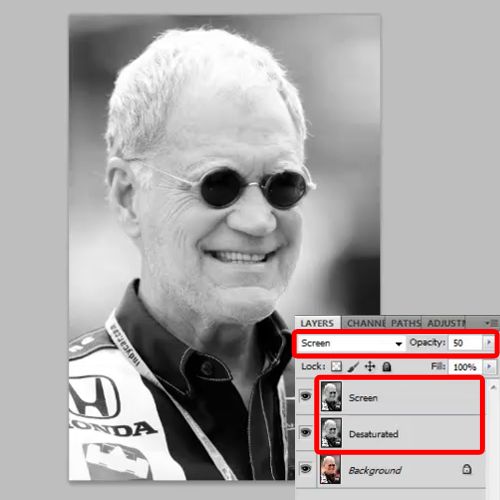
In order to start off with the process of enhancing the contrast of an image in Photoshop, you will firstly need to duplicate the original layer and de-saturate the image present on the canvas. Now you will need to duplicate the de-saturated layer and change the blend mode of this layer to the option titled “Screen”. Once this is done, you must reduce the opacity of the layer to 50 percent.

Step 2 – Changing the blend mode
Next, you will need to duplicate the original layer, move it right at the top and change the blend mode of this layer to the option titled “Color Burn”. Once this is done, you must reduce the opacity of this layer to 75 percent.

Step 3 – Merging layers
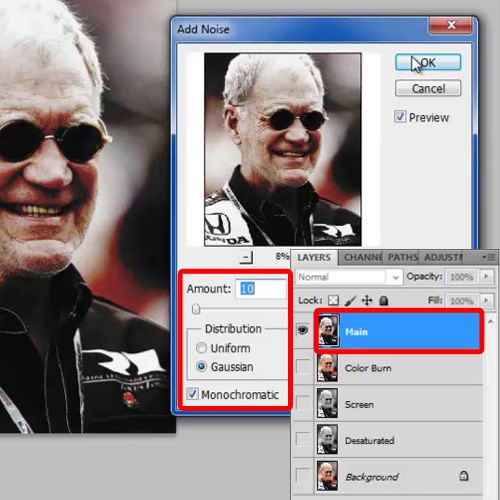
Now duplicate all the layers and merge them into a single layer. This layer would serve as the basis for the contrast filter but before that, open up the Filter menu, move over noise and click on the “Add Noise” filter.
Choose 10 percent for the amount, and choose the options titled “Gaussian” and “monochromatic distribution” for the filter.

Step 4 – Adjusting the filter
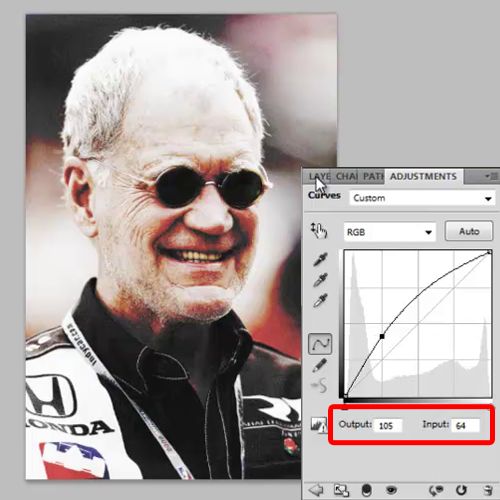
Now select the layer and add a curved adjustment layer. Adjust the filter according to the image. You will need to try various options out and see which of the photo image effects, looks the best. This filter can vary from image to image.

Step 5 – Using the “Overlay” blend mode
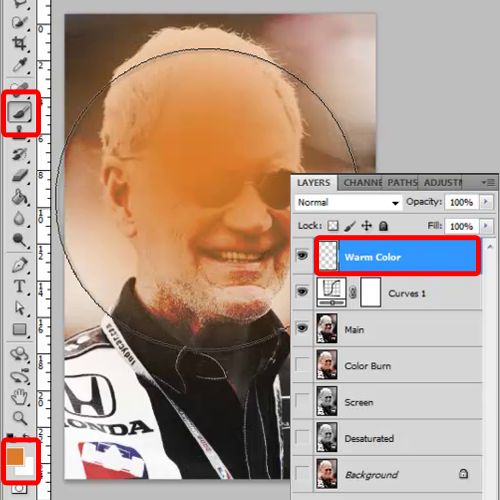
Now, create a new layer, pick up the brush tool and choose “db7c28” for the color fill. Next, you must increase the size of the brush till it covers the whole face and apply the brush on the canvas.
Change the Blend Mode of this layer to the option titled “Overlay” and reduce the opacity of this layer to 50%. Your Photoshop effect is now successfully complete. You could go over all the steps once again in order to ensure you have performed all the functions correctly, thus getting better results.

 Home
Home