Layers are a very important part of graphics work. Photoshop layers are like sheets of stacked acetate. You can see through transparent areas of a layer to the layers below. You move a layer to position the content on the layer, like sliding a sheet of acetate in a stack. You can also change the opacity of a layer to make the content partially transparent. Layers are used to perform tasks such as compositing multiple images, adding text to an image, or adding vector graphic shapes. You can apply a layer style to add a special effect such as drop shadow or glow.
You can create layers in Photoshop document in three different ways. In this tutorial, we will teach you how to create a new layer in Adobe Photoshop.
Step 1 – Through the Layer Menu
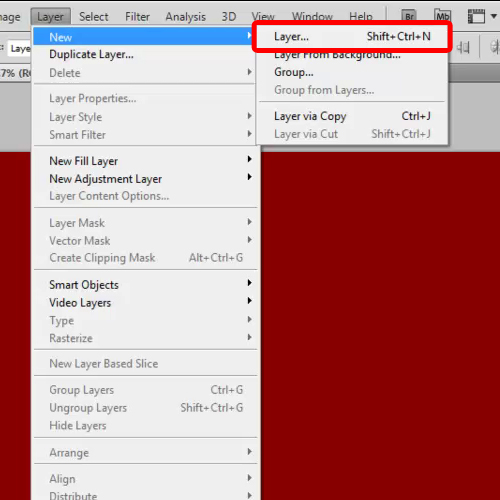
First of all, you can go to the “layer” menu. From the drop down list move over to “new” and click on the “New layer” option.

Step 2 – Configuring the New Layer Window
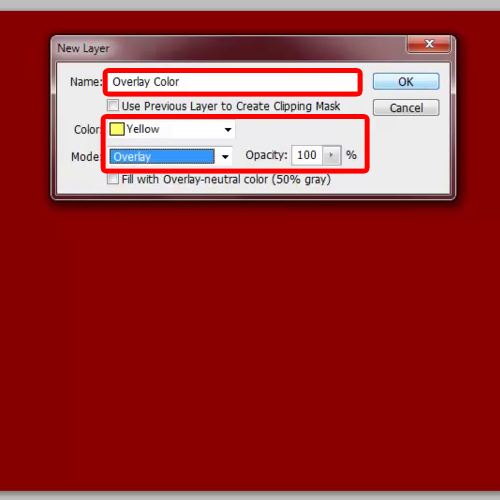
With that done, a new window would appear on your screen. Here you can name your layer, assign the layer a color in the layer panel, change the blend mode of the layer and increase or decrease its opacity.
With that done, click on the “Ok” button and a new layer would be created. You can see that the blend mode of the newly created layer has been automatically changed to “overlay”. Now let’s test to see if this works.
Choose a color, pick up the brush tool and apply it on the layer. You will be able to tell the difference now when the blend mode is “Normal” and when it is “Overlay”.

Step 3 – Through the Create a New Layer Button
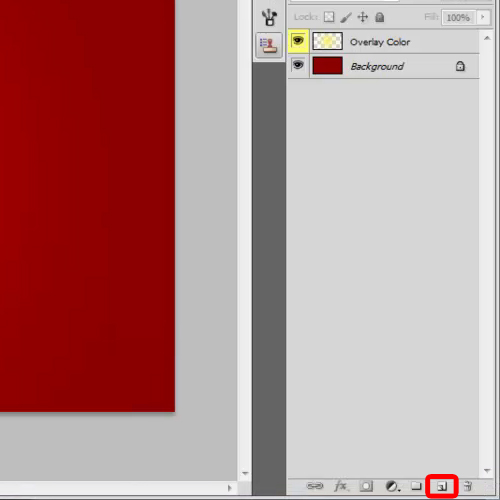
Another way to create layers in Photoshop is by simply clicking on the “create a new layer” button at the bottom of the “layers panel”. This will automatically add a new layer in your document.
Now, we’ll delete this layer and bring an image of a frame on the canvas. As you can see the frame is divided into two layers, with the frame in one layer and the canvas on the other.

Step 4 – Using the shortcut key
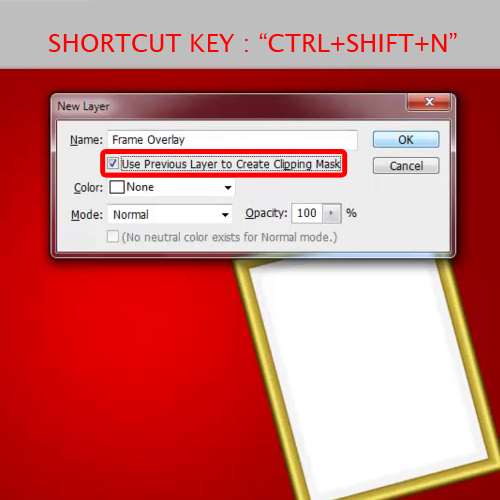
The third way to create new Photoshop layers is by using the “CTRL SHIFT N” shortcut key. Once you press this shortcut key, the new layer window would appear.
You can tick on the checkbox next to the “Use Previous Layer to Create Clipping Mask” option. This would automatically create a clipping mask once the new layer is created.
Now you can use the bottom layer as the base through which the content on the above layers can be seen.

 Home
Home