The effects of colors on any image are clearly visible to all. The importance of adding vibrant colors to an image can never be overlooked at any cost. It’s the basic element which can capture the attention of the average viewer. With Photoshop you can add various color effects to your images.
Follow this step by step guide and learn how to add colors to a picture in Photoshop.
Step # 1 – Open an Image
In the first step, launch Adobe Photoshop, load an image and bring it on to the canvas.

Step # 2 – The Levels Adjustment Filter
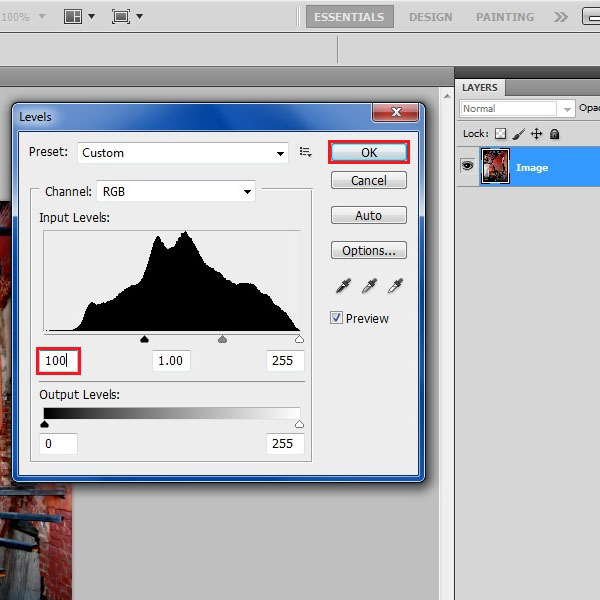
After loading the image, go to the “Image” menu, select “Adjustments” and click on the “Levels” option from the list. A new window will open which allows you to change the levels filter on any image. In this window, move over to the input levels and input the values “100”, “1.00” and “255” respectively. Now click on the “OK” button to apply these settings on the image.
Step # 3 – Adjusting the Saturation Level
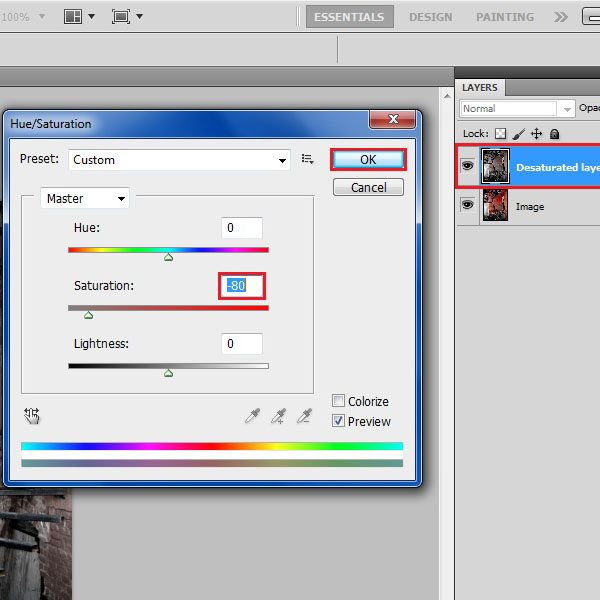
Create a duplicate copy of this layer and rename the layer “Desaturated layer”. Now go to the “Image” menu, select “Adjustments” and click on the “Hue/Saturation” option from the list. In this window, decrease the “Saturation” value to “-80” and click on the “OK” button to apply these settings.
Step # 4 – Coming back to the levels adjustment filter
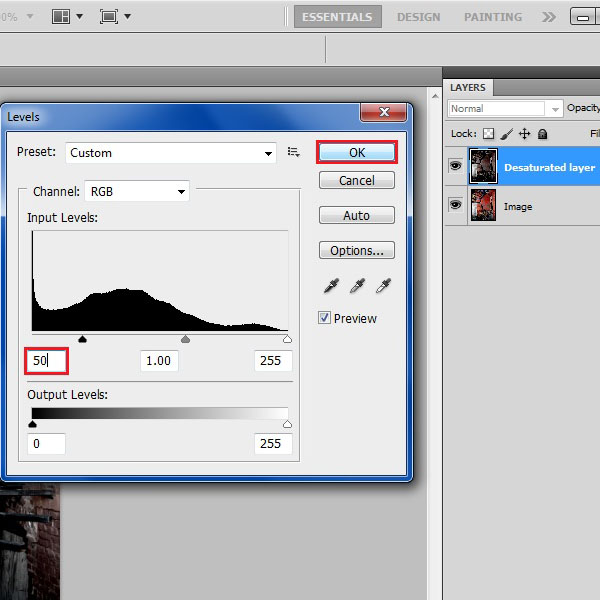
Go to the “Image” menu, select “Adjustments” and click on the “Levels” option from the list. In the level settings panel, set the values to “50”, “1.00” and “255” respectively. Once done, click on the “OK” button to apply these changes on the image.
Step # 5 – Change the Blending Mode
Now select the “Desaturated” layer and change its blending mode to “Screen”.

Step # 6 – Apply the Clouds Filter
Now insert a new layer and rename the layer to “Clouds layer”. Click on the “Foreground” color option and set its color by entering the color code “1F768C” in the color palette. Similarly enter the “Background” color code “62bdd3” in the color palette. After changing colors, go to the “Filter” menu, select “Render” and click on the “Clouds” filter from the list. Once the cloud filter is applied, change the blending mode of this layer to “Overlay”. This would add a bluish tone to the overall image.

Step # 7 – Applying the Lighting Effect
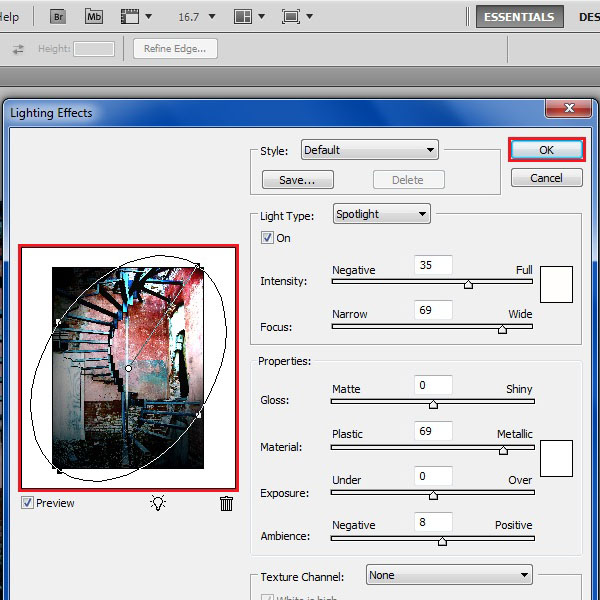
Press the “CTRL+SHIFT+ALT+E” key on the keyboard. This would merge all the layers in to a single layer. Rename the layer to “Final Effect”. Once done, go to the “Filter” menu, select “Render” and click on the “Lighting Effects” filter from the list. In the “Lighting Effects” filter window, adjust the lighting ellipse tool to create a light source emerging from the top right corner of the image. After adjusting these settings, click on the “OK” button to apply this filter on the image.
Step # 8 – Adjusting the Brightness
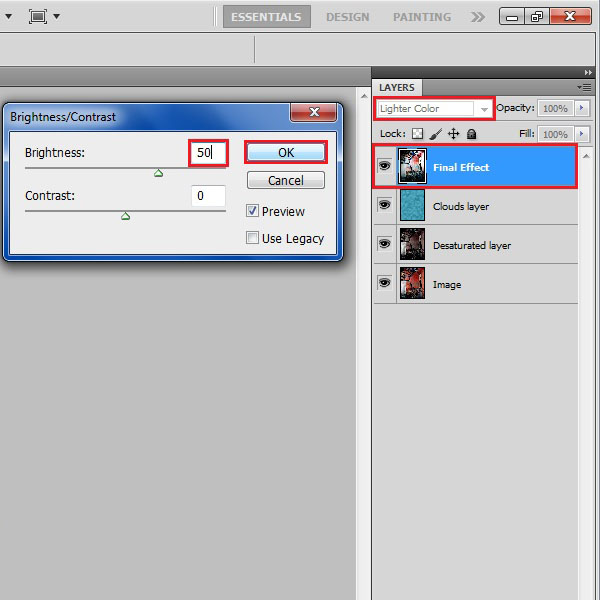
After applying the Lighting filter, change the blending mode of this layer to “Lighter color” from the menu. Now go to the “Image” menu, select “Adjustments” and click on the “Brightness/Contrast” option from the list. In the “Brightness/Contrast” settings window, set the “Brightness” level to “50” and click on the “OK” button to apply it on the image. And that’s it.
 Home
Home