In this tutorial, we will guide you on how to create an ice effect in After Effects CS6. This particular tutorial is fit for all of you out there, no matter a pro or just beginning out. We will be using various effects to create a smooth icy texture for the background.
Step # 1 – Create a solid layer
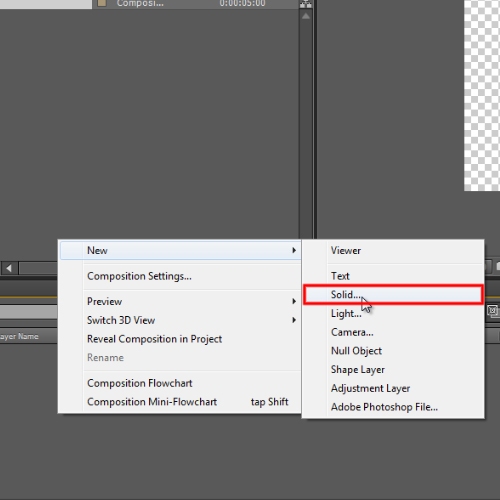
First of all, you will need to generate a black solid layer and apply the fractal noise effect on it in Adobe After Effects CS6.

Step # 2 – Configure Fractal Noise Effect
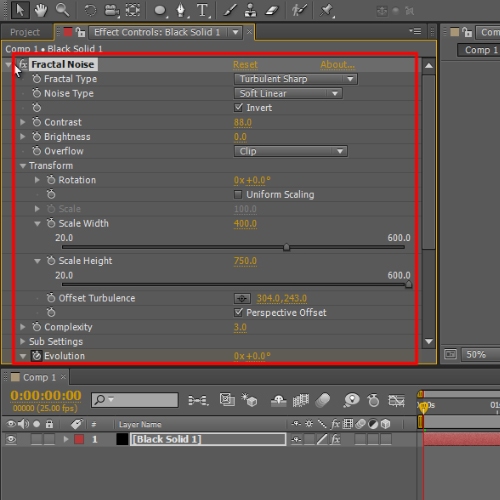
Once done, we will need to configure the settings for fractal noise effect. Change the fractal type to turbulent sharp, noise type to Linear, tick on the checkbox titled “Invert”, set the contrast level to 88.0 and brightness to 0.0. Now choose the clip option from the drop down menu next to Overflow. Now expand the Transform menu, uncheck the uniform scaling option, set the scale width to 400.0, scale height to 750.0, offset turbulence to 324.0 and 243.0 respectively.
Now tick on the checkbox titled “Perspective offset” and set the complexity to 3.0. You can change the evolution settings as well to change the layout of the effect. For this Adobe After Effects CS6 tutorial, we won’t be changing this particular option. Now expand the evolution menu, tick on the checkbox titled “Cycle Evolution”, set the number of cycle in revolutions to 3 and keep the rest of the settings as they are.

Step # 3 – Configure Turbulence Displace Effect
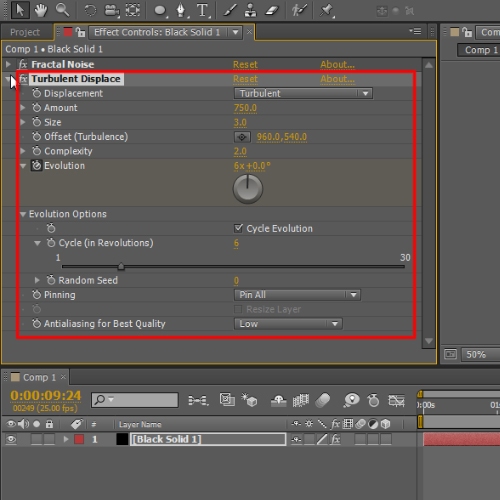
Now we will add the turbulence displace effect on the clip. Move over to the configuration window and set the displacement to “Turbulent”, amount to 750.0, size to 3.0, offset turbulence to 960,540 and complexity to 2.0.
Now animate the evaluation menu as interval should be of (0x+0.0degree to 6x 0.0degree).
Expand the Evolution option menu, tick on the checkbox titled “Cycle Evolution” and set the number of cycle in revolutions to 6.

Step # 4 – Configure Hue/Saturation Filter
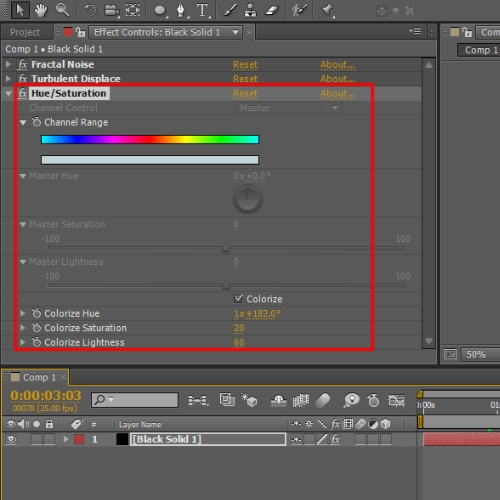
Now add the Hue/Saturation filter to the clip. Move to the configuration window and tick on the checkbox titled “Colorize”. Set the color hue to “1 x +182.0 degree”, color saturation to 20.0 and color lightness to 60.0.

Step # 5 – Apply an Ellipse Mask
Once done, generate a solid layer and choose “0f4356” for the color fill.
Now apply an ellipse mask and change its mode to subtract. Move to the configuration window and set the mask feather to 676 pixels and mask expansion to 163 pixels.

Step # 6 – Duplicate the layer
Lastly, duplicate the same layer and you’d be done. The ice effect in After Effects is now ready for use.

 Home
Home