The time has gone when pictures and images were considered as a very complicated and rear term in computer systems. Nowadays images are the most important and frequent used material in computers. Many types of images are used including static, dynamic, animated, high resolution and so on. Now even latest cameras are equipped with the option of taking high definition images with extreme details. In this Photoshop HDR tutorial, we will guide you to create HDR effect on a simple image which refers to “High Dynamic Range” to make it more detailed and eye catching. We are using Photoshop in this tutorial which is an easiest image editing application available.
Follow these easy steps to learn how to produce HDR images on Photoshop.
Step # 1 – Open Shadow/Highlights Settings
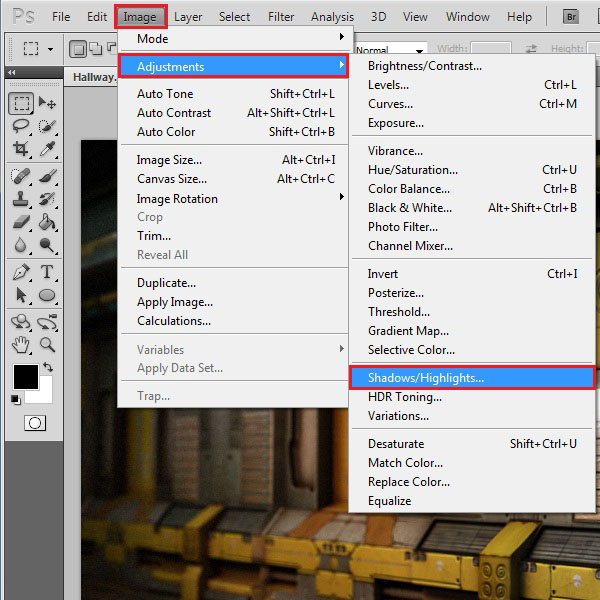
In the first step, load the image in Photoshop and go to the “Image” menu. Select the “Adjustments” option and click on the “Shadow/Highlights” option from the menu.
Step # 2 – Adjust Shadow and Highlight Settings
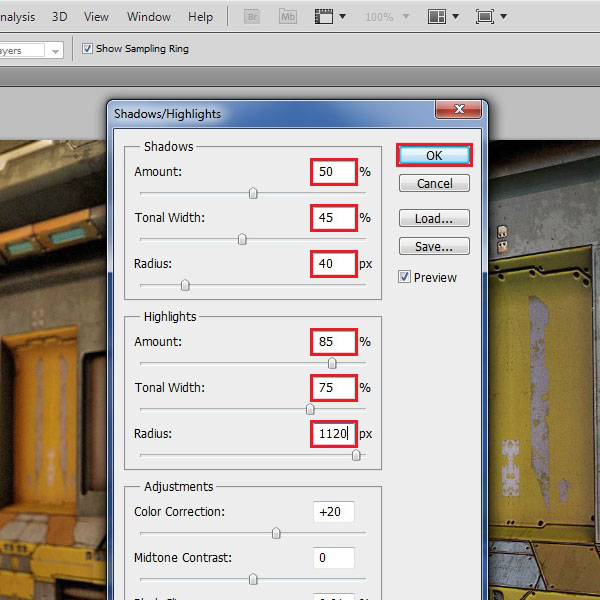
In this panel, choose the Shadow’s “Amount” to “50 %”, “Tonal Width” to “45 %” and “Radius” to “40 %”. Now change the Highlight’s “Amount” to “85 %”, “Tonal Width” to “75 %” and “Radius” to “1120 %”. Click on the “OK” button to apply these changes on the image.
Step # 3 – Create a Color Dodge Layer
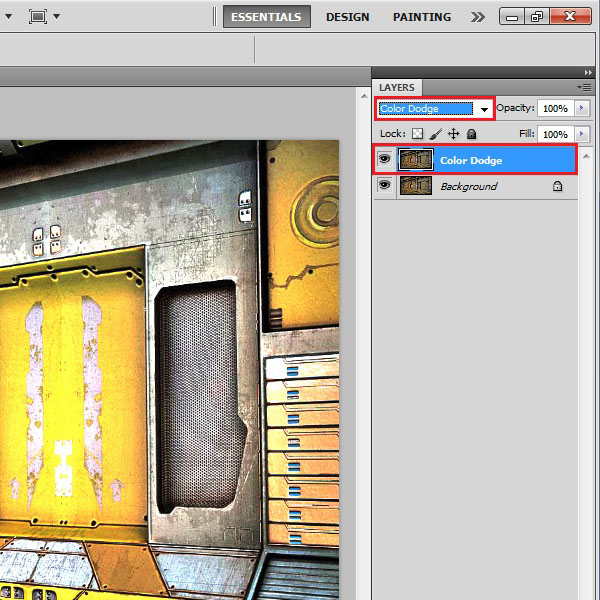
Now go to the Layers Panel and make a duplicate of the Background layer. Choose the name of this duplicate layer as “Color Dodge” and change its Blending Mode to “Color Dodge” from the menu.
Step # 4 – Create a Linear Burn Layer
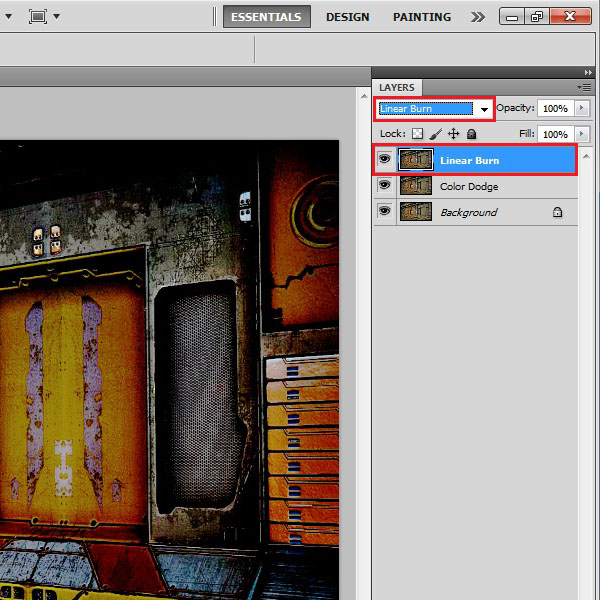
Now make another duplicate of the “Color Dodge” layer and choose its name as “Linear Burn”. Change its Blending Mode to “Linear Burn” from the menu.
Step # 5 – Select the Color Range
Press “D” on your keyboard to set the “Foreground” color to “Black”. Now go to the “Select” menu and click on the “Color Range” option from the list.
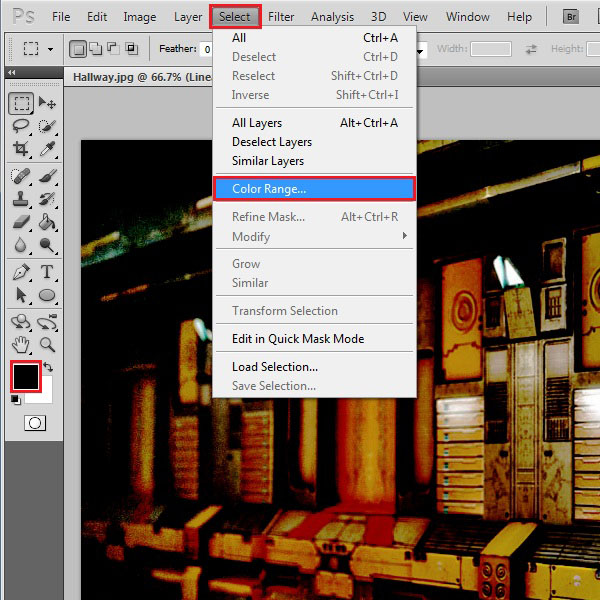
Step # 6 – Adjust Color Range Settings
In this window, choose the “Fuzziness” value to “100”, select the “Invert” option and click on the “OK” button to apply it.
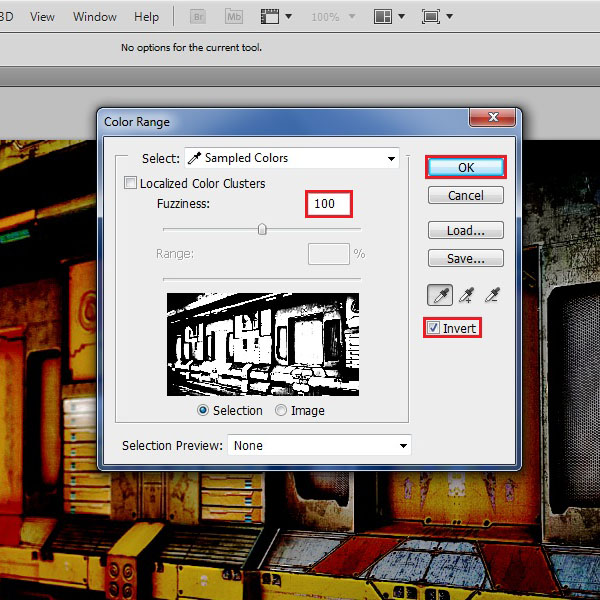
Step # 7 – Create a Mask
Now click on the “Add layer mask” button to add a selection mask on this layer.
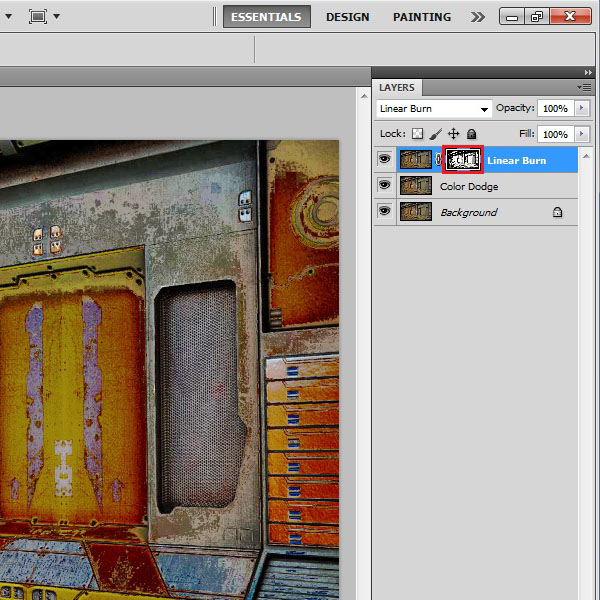
Step # 8 – Apply a Gaussian Blur
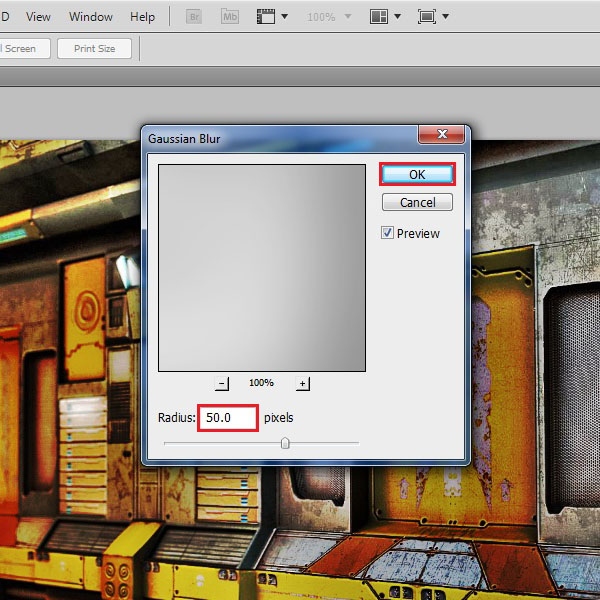
Now select the layer mask and go to the “Filter” menu. Select the Blur” option and click on the “Gaussian Blur” filter from the list.
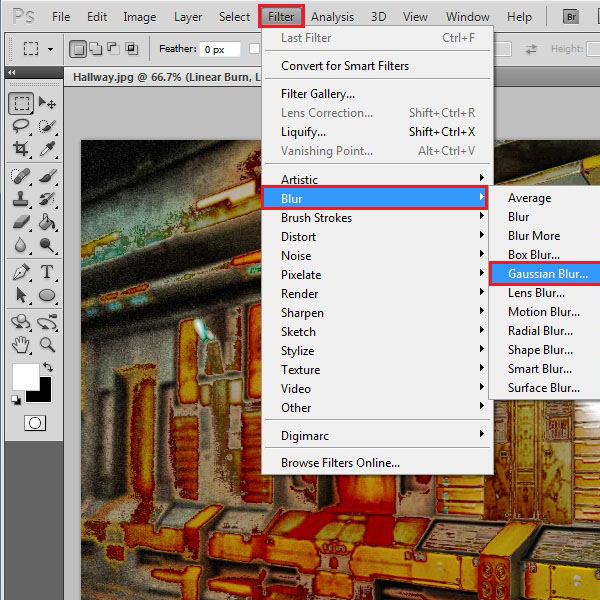
Step # 9 – Choose its Radius
Choose the “Radius” of the filter as “50 pixels” and click on the “OK” button to apply these changes on the layer.
Step # 10 – Adjust the Opacity
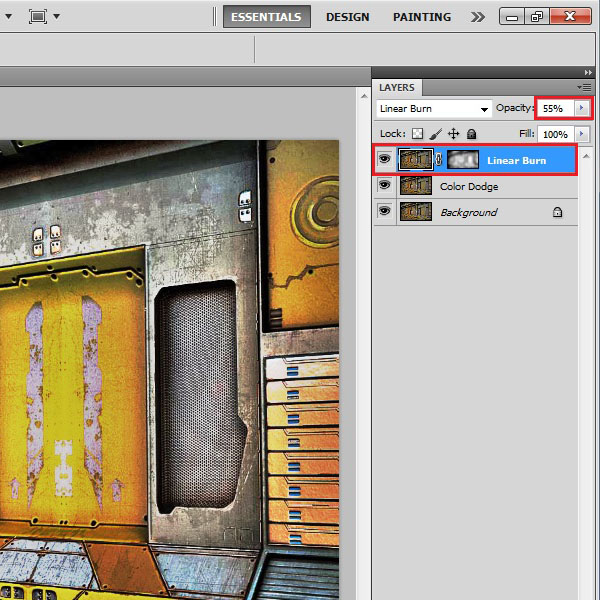
Select the “Linear Burn” layer and go to the “Opacity” option. Click on it and change the opacity to “55 %”.
Step # 11 – Create an Overlay Layer
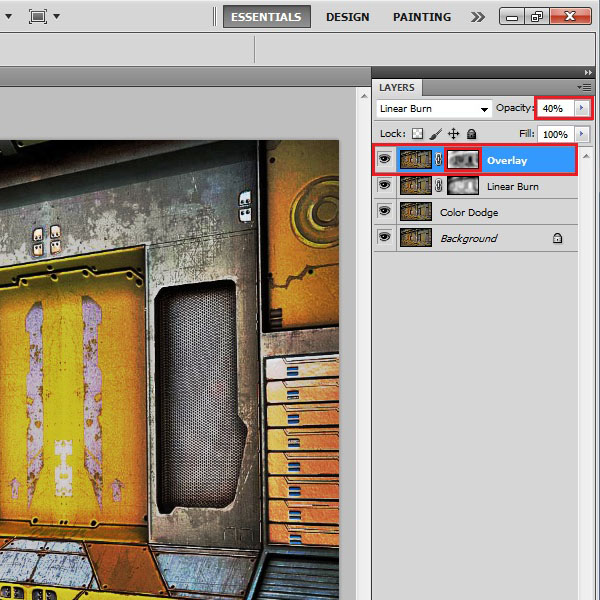
Now make a duplicate of this layer and choose its name as “Overlay”. Change the Blending Mode of this new layer to “Overlay” from the menu.
Select the layer mask and press “CTRL + I” from the keyboard to invert its selection. Now change the “Opacity” option of this layer to “40 %” from the menu.
Step # 12 – Select the Color Range
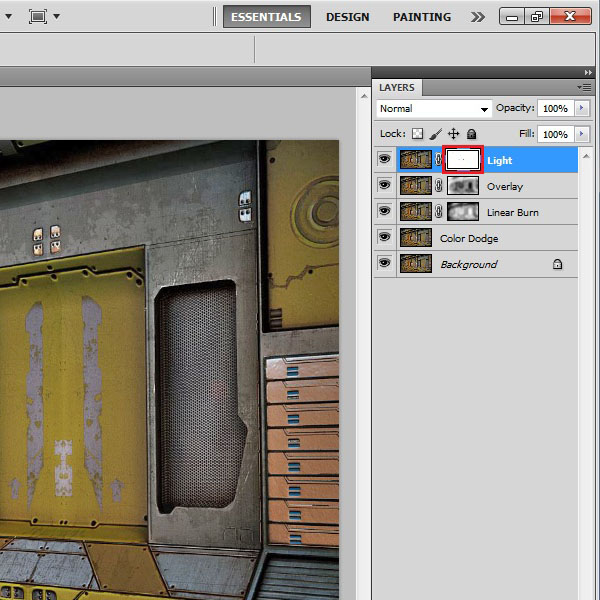
Now select the “Background” layer and duplicate it. Choose the name of this duplicate layer as “Light” and move the layer on top of other layers.
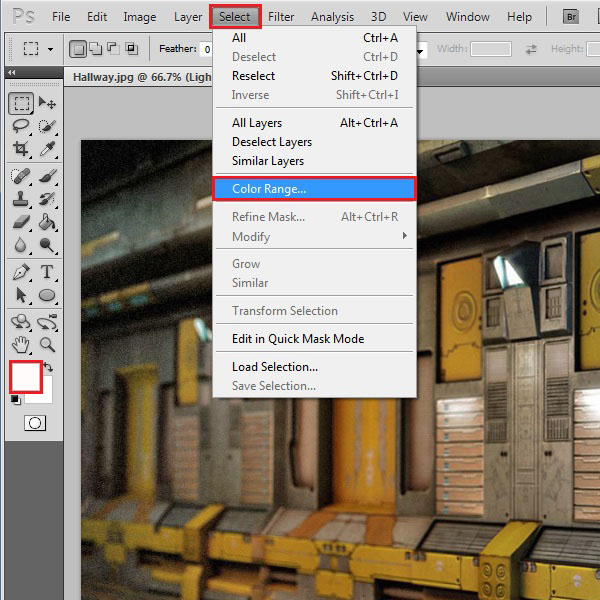
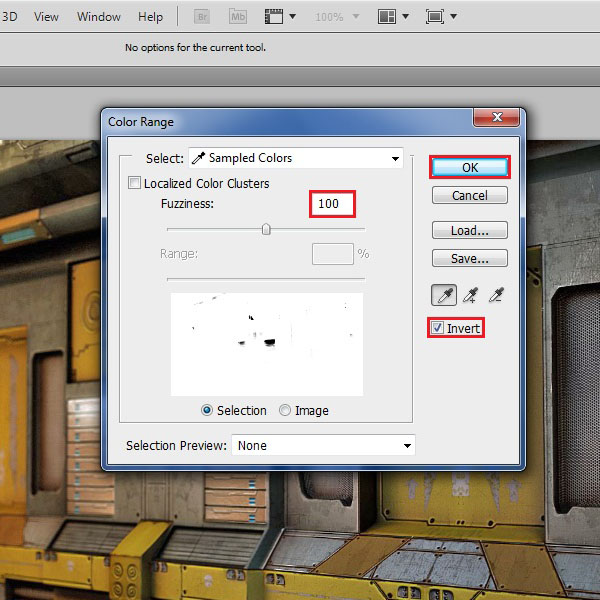
Change the “Foreground” color to “White” from the Tool bar, go to the “Select” menu and click on the “Color Range” option.
Step # 13 – Adjust Color Range Settings
In this window, select the “Fuzziness” option to “100”. Now choose the “Invert” option and click on the “OK” button to apply these changes.
Step # 14 – Create a Mask
Now click on the “Add layer mask” button to add a selection mask on this layer.
Step # 15 – Apply a Gaussian Blur
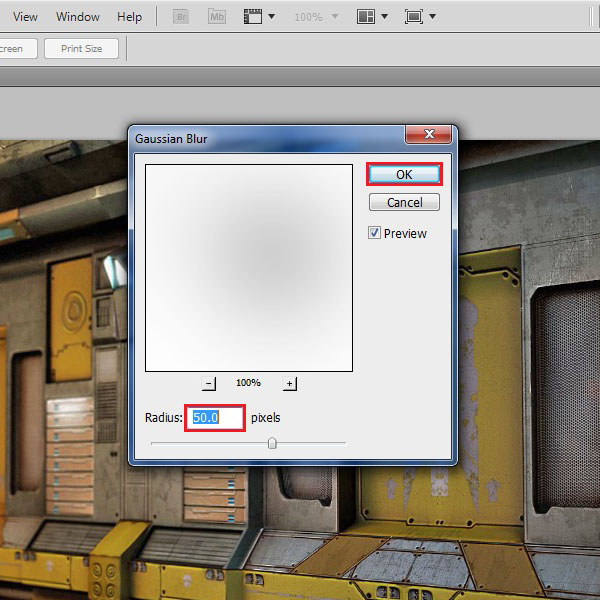
Now select the layer mask and apply a Gaussian Blur filter by choosing the “Radius” option as “50 pixels” on this layer.
Step # 16 – Create a Colorize Layer
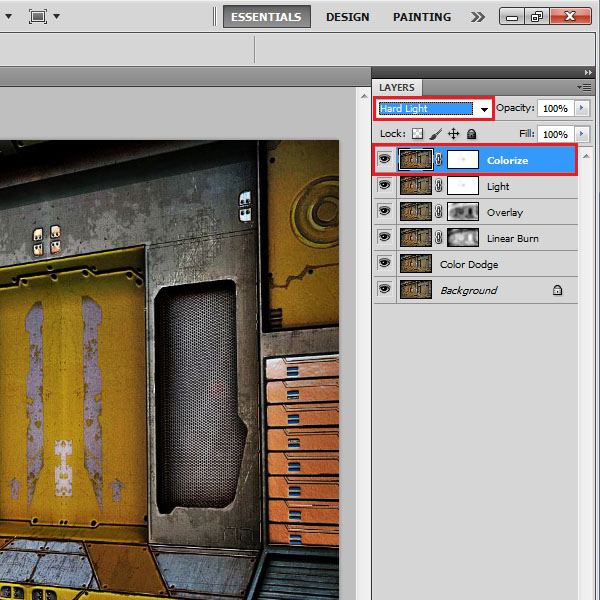
In the last step, create a duplicate of this layer. Choose the name of this duplicate layer as “Colorize” and change its Blending Mode to “Hard Light” from the menu.
Now the picture is successfully converted into an HDR image
 Home
Home