In this tutorial, we will guide you how to use of RGB Parade feature in Adobe Premiere for color toning and improving the digital video.
RGB Parade is basically a graphical solution within Adobe Premiere for enhancing the color of the video. All the three color channels in a video, that is red, green and blue, can be viewed and dealt with separately with this feature. This enables you to do a very accurate color correction.
Step 1 – Enabling the RGB parade feature
For this tutorial, we will be working with the clip you can see in the screenshot below. Notice that the colors of the hot balloon are vibrant with blue, red, yellow and orange, but still the footage is quite dull and the surrounding seems a bit blur.
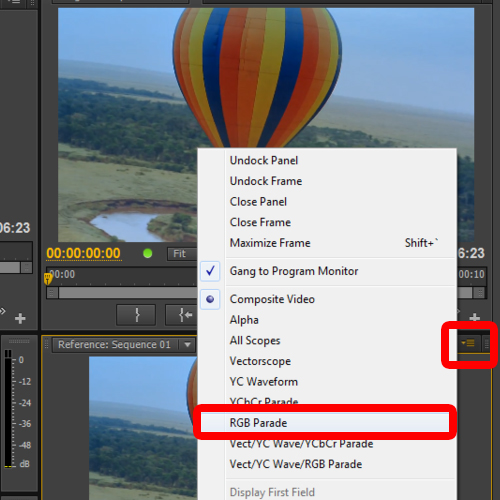
To start with the video color correction, move to the reference monitor section first and click on this icon over here with the three horizontal lines and a downward facing arrow. Once the menu opens up, we will click on the RGB parade option.
Step 2 – An introduction on the RGB graph
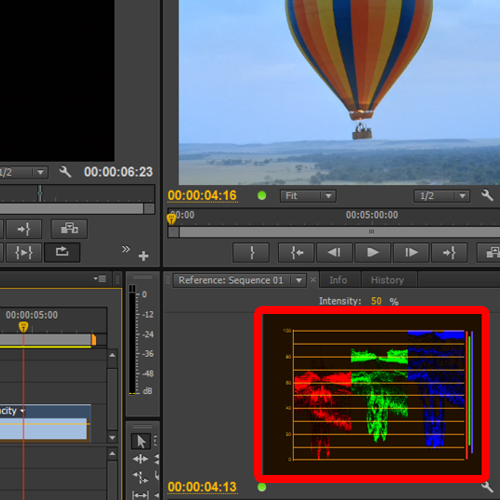
With that done, you will see a graph showing each color channel separately. In this case, blue has the larger value, while green and red are comparatively used less.
Note that the reference window is showing the value of the current scène appearing on the program monitor above. As you move the clip forward, the graph changes its value in real time according to the current scene.
Step 3 – Configuring the Color Balance Filter
Now let’s start with the color correction by moving to the effect panel and typing “RGB”. From the results, simply click on the “Color Balance” option under the “image control” section and drag it on the clip.
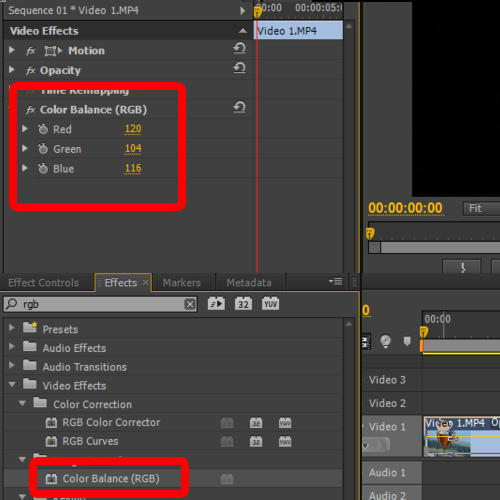
With that done, move to the effect control panel and configure the Color Balance effect.
Previously we saw that the overall value of blue used in the clip exceeded all the rest of the channels. To make the colors crisper, we would have to increase the value of the red channel as well. For that, we have kept the value at 120. You will see that the color intensity in both the scene as well as in the waveform changes accordingly.
Next, we have kept a fine balance between the green and the blue channels choosing 104 for Blue and 116 for green. These values will normalize the color gain according to each other.
Step 4 – The RGB curves filter
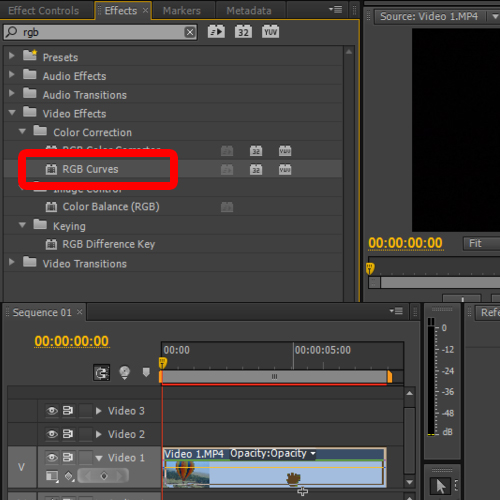
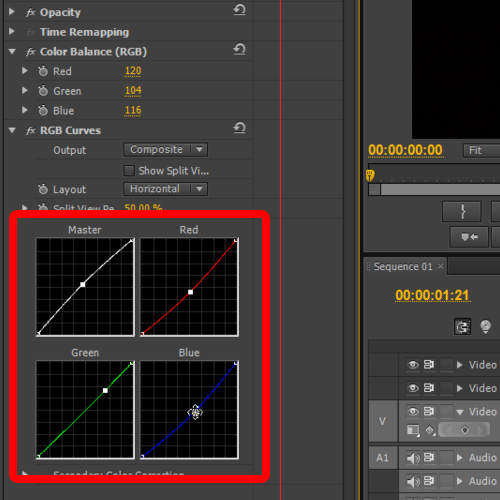
Next, we will apply another video effect with the name of “RGB curves” from the effect menu on top.
Step 5 – Setting the graph for each color channel
With that done, move to the effect control panel where you will see four graphs. Here, pull the RGB Master Graph’s curve upwards in order to gain more from all the three channels of colors.
Next, bend the Red and blue channel down for decreasing the gain in these two channels. To drag the whites down, drag the point for the Green channel towards the upper right corner. While for the rest of the channels, we are just adjusting the mid-tones. That’s why the points are at the center of the curves.
Step 6 – Configuring the brightness and contrast
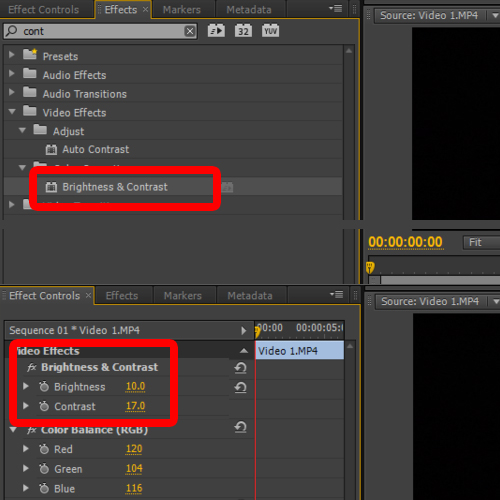
Once done, apply the “Brightness and Contrast” effect from the color correction category and Move to the effect control panel. Over here, we will set the contrast level to 17 and brightness to 10.
And that’s basically all you need to know to do basic video color correction. Play around with the filters and apply different values to see what looks better on your clip. You can keep checking the RGB parade window for keeping in check each of the three levels when editing the colors of the clip.
 Home
Home