In this tutorial, we will guide you on how to use the color key effect, also known as the chroma key. With Adobe Premiere, green screen backgrounds can be removed very easily.
Using the Color key effect, you can remove specific chrome from the footage and combine it with the background. The whole process is known as Chroma key Technology, in which the video shoot is done with a green or a blue background.
To get started, you will need a video shot in green screen and a virtual set for the background.
Step 1 – Adding the virtual set
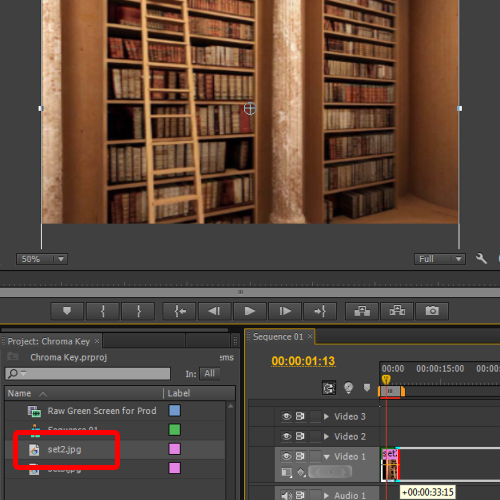
Over here, in the media library section, we have all the resources already imported. So we will start by first dragging the virtual set, which is an image, and drag it over the timeline.
With that done, we will increase the duration of the image on the timeline and adjust it according to the frame size.
Step 2 – Green screen Footage
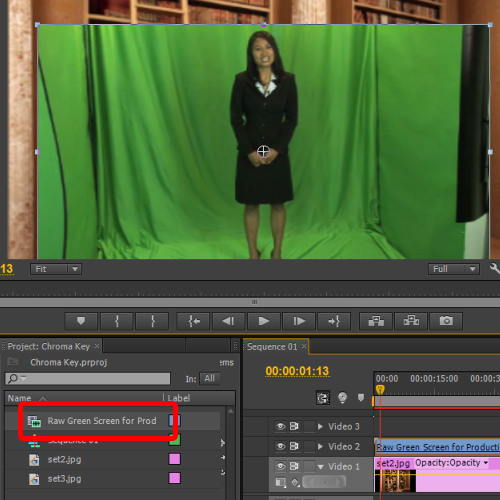
Next, we will drag and drop the green screen footage to the video overlay track, that is the layer above the original virtual set layer. If you look in the screenshot below, we have dragged the green screen footage on the layer titled “Video 2”.
Now, let’s set the duration of the clip on the timeline, transform the clip size and place it according to the backdrop. You would want to transform the video size according to where you want the person to appear. For this tutorial, we have placed the footage in such a way that the anchor is appearing towards the right side of the screen.
Step 3 – Cropping the video
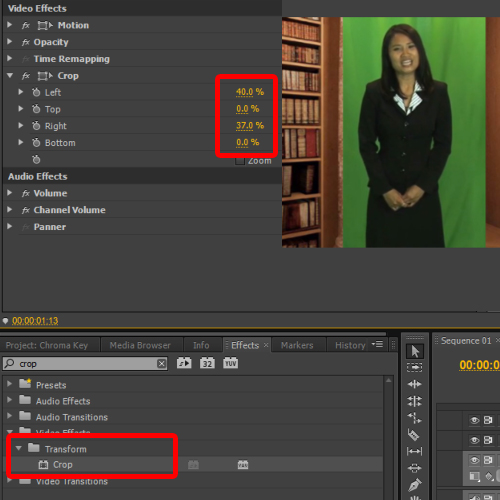
With that done, we will go to the effects menu and apply the crop video effect on the green screen clip. This will allow us to remove the unwanted part of the clip. Simply move to the “effect control panel” and you can crop the clip from all sides by changing the values highlighted in the image below.
Step 4 – Auto Contrast Filter
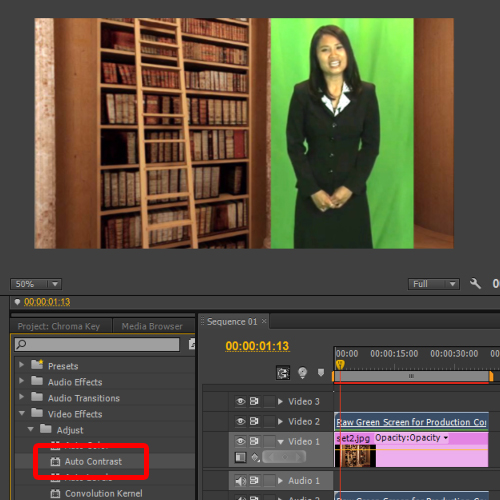
Now let’s apply the “Auto Contrast” video effect, from the effects menu over here. We will apply this effect on the same green screen video layer which we cropped earlier. This will adjust the contrast of the footage and removes the mid tones.
Step 5 – Ultra Key Effect
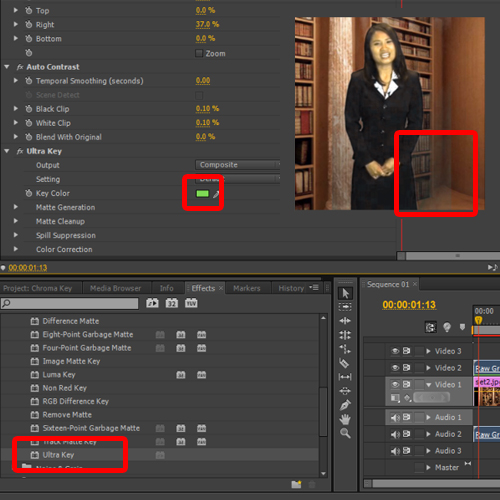
With that done, you can move to the Effect menu to apply the Ultra Key effect located in the keying folder. We will apply this effect on the green screen video layer.
After that, you will have to move to the effect control panel and expand the ultra key Menu. There, click on the color picker icon next to the Key color option and select the background color which is to be removed.
In this case, the background color is green.
Now you can see that in adobe premiere green screen chroma has been removed while only the subject remains on the screen. But if you look closely at the screenshot below, you can still see some of the shades existing within the frame.
Step 6 – Final Adjustments
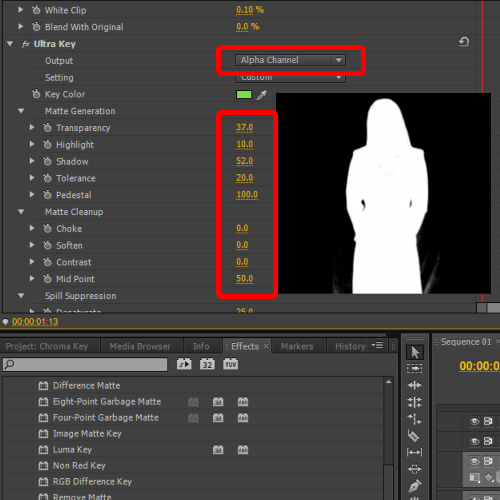
To apply the color key effect in a better way, select the alpha channel from the output menu. Now you can see each and every shade that will appear on the layer. Here, we will configure each and every individual setting to make sure that the background is removed.
For that, expand the Matte Generation menu and set the Pedestal option to 100.You can see the changes taking place in the preview pane over here in real time. With that done, set Highlight to 10, Transparency to 37, Shadow to 52 and Tolerance to 20. You can play with the values according to the clip you are working with.
Next, we will open up the Matte Cleanup menu and set the Midpoint value to 50.
And that’s basically it. If you switch back to the composite mode, you will see that the color key effect has been successfully applied on the overlay video layer.
 Home
Home