In this tutorial we will guide you on how to use the leave color video effect in Adobe Premiere.
This effect is used to desaturate the whole clip, excluding one color, to produce a monochromatic video frame. For this tutorial, we will be using a clip of a blossoming red rose, where we are going to desaturate the whole footage except the color of the rose.
Step 1 – Leave Color effect
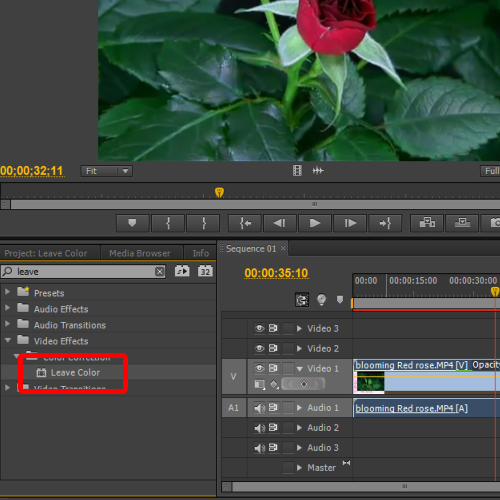
Once you have added the footage in the timeline, simply move to the Effects menu and type “Leave” in the search box.
You will find only one video effect with the name of “Leave Color” in the results under the color correction section. To isolate color from the clip, simply apply the filter on the clip by dragging the effect into the video layer.

Step 2 – Configuring the Leave color effect
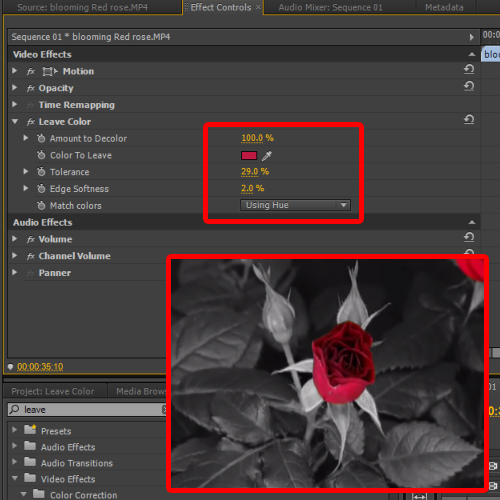
To configure the effect, move to the effect control panel on top and go to the Leave color menu.
To isolate color from the video, pick the color which you want to be left out, by using color picker tool next to the “color to leave” option. Increase the amount of decolor to 100 and notice how the rest of the footage is desaturated.
Next, move to the tolerance option and increase it according to your footage. Keep changing the values so that only the selected color appears on the screen. With that done, select “using Hue” from the drop down menu next to the Match Color option. This will strictly follow the monochromatic variance to the selected value.
Lastly, increase the edge softness to 17% and you are done.
In the screenshot below, you can see that only the selected color is being displayed on the screen, while the rest of the sequence is desturated.

 Home
Home